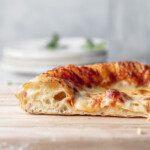
This artisan pizza dough will give you a billowy soft crust, blistered bubbles and a crispy bottom. It uses a high hydration and long fermentation time for maximum flavor and the perfect crackly, chewy texture.

This post may contain affiliate links. As an Amazon Associate, I earn from qualifying purchases.
I think it’s safe to say that pizza dough is one of the most important parts of a good pizza. The crust is the foundation (literally) of flavor and texture-- you should make it as delicious as you can.
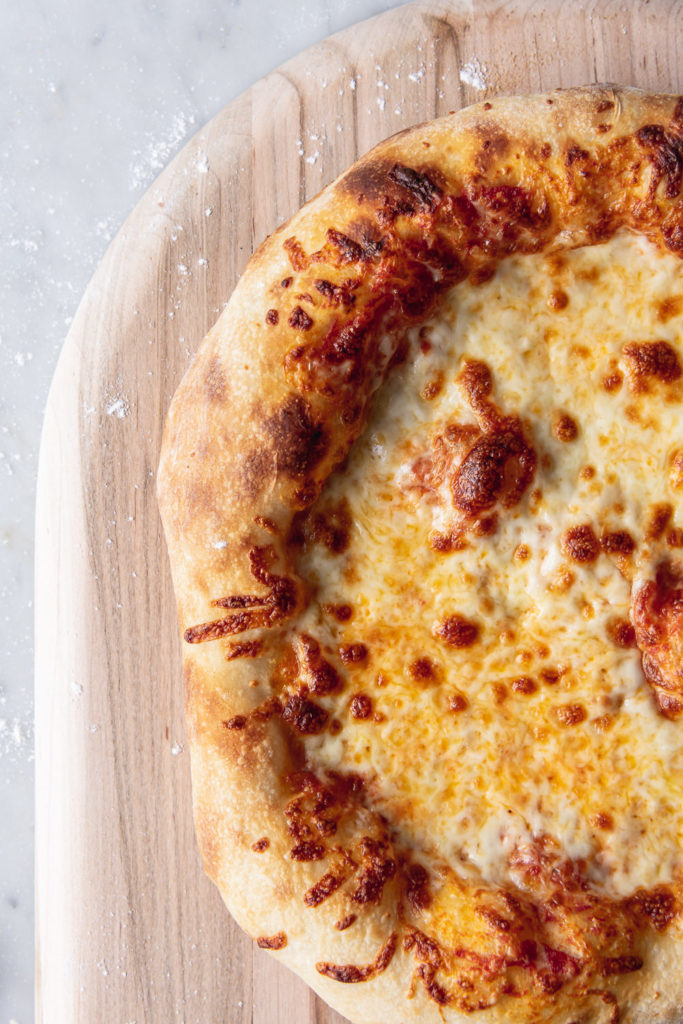
So what exactly does it mean to have the best pizza crust? For me, a great artisan pizza has a complex flavor, big bubbles, a creamy crumb and crispy edges. Believe it or not, you can achieve all of these qualities in your home oven with stunning results.
There are 3 big factors that contribute to the best pizza dough:
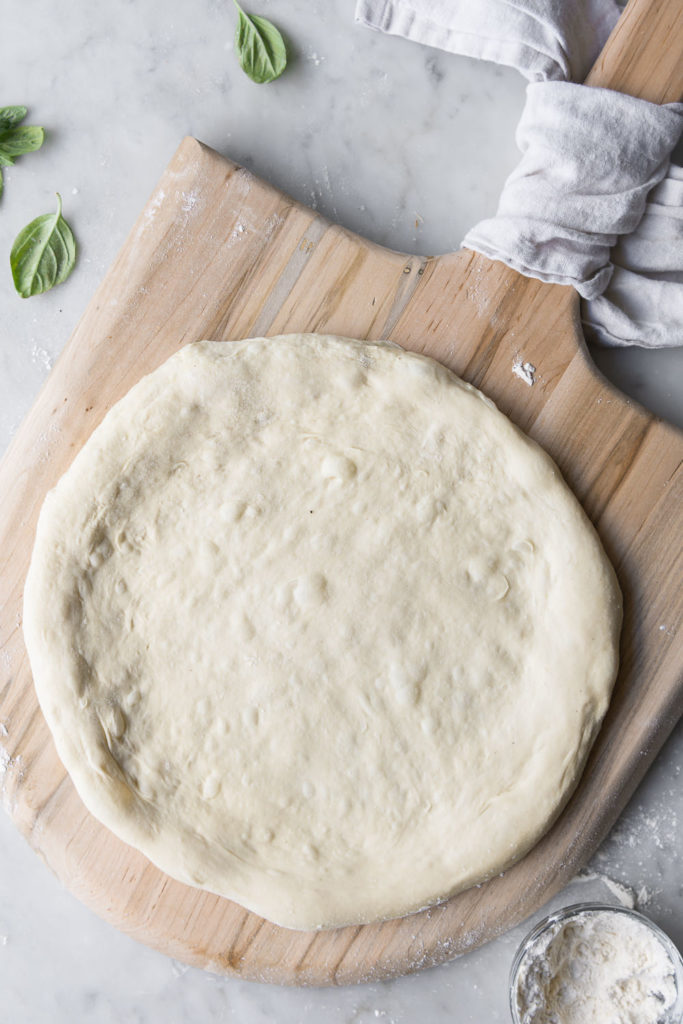
- High hydration dough: I prefer to use a dough that is around 75% hydration (the percent of water relative to the amount of flour). This will encourage a lot of gas bubbles, a chewy crust and a complex flavor. But the dough won’t be so sticky that it feels impossible to work with. The dough will also have enough structure to be shaped into a pizza and slid off the peel.
- Long bulk fermentation: a small amount of yeast and a slow fermentation will help develop flavor and strength. This pizza dough ferments for about 6 hours at room temperature. For maximum flavor, you can let it slowly ferment in the fridge for up to 2 days.
- A surface that can get really hot: This could be a baking steel, pizza stone, inverted baking sheet or cast iron pan, or even an unglazed tile. These surfaces are preheated in your oven to absorb as much heat as possible. The result is a gorgeous artisan pizza with a crackly crisp crust and spots of char.
Note on flour: Yes, high quality 00 flour will give you delicate flavor, chew, and delicious results. I'm a huge proponent of using the best ingredients I can find. But in the case of great homemade pizza crust, flour type comes second to the key techniques outlined above. If you can't find 00 flour, any good all-purpose flour will work just fine!
watch the video to see how to make this chewy pizza dough recipe:
tips for making artisan pizza dough:
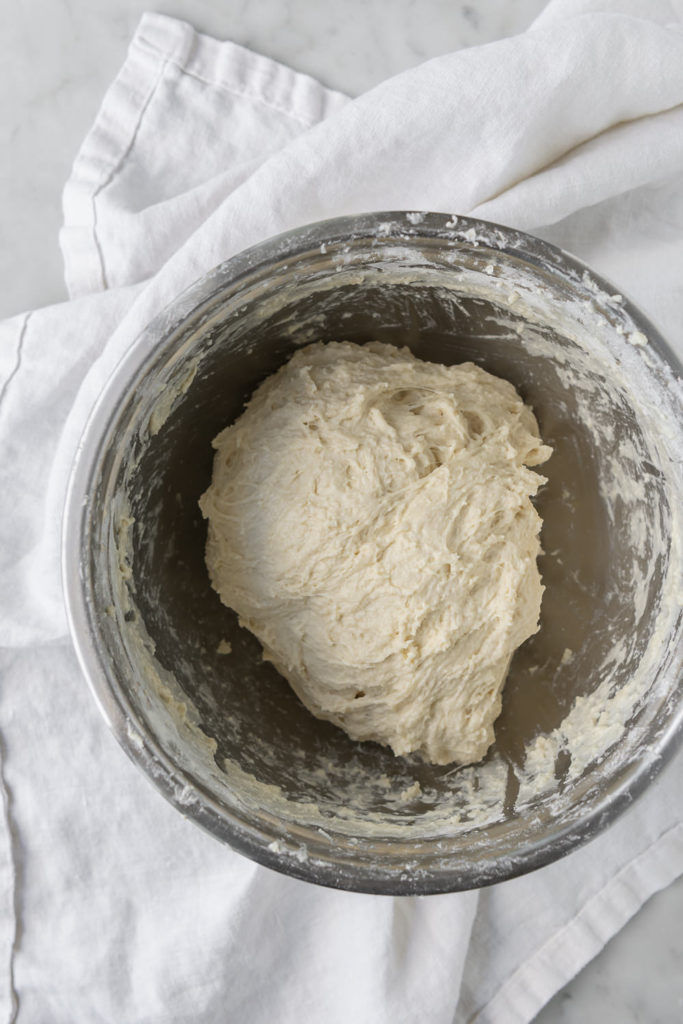
The high hydration dough is a huge part of what makes this crust so chewy, crispy and delicious-- but it takes some getting used to. It’s a wet, slack, sticky dough that may be a far cry from what you usually work with.
Once you learn how to handle it (and taste the finished pizza), I promise you won’t look back to the denser doughs you’ve made in the past. Here’s what I’ve found to be the most helpful:
- Lightly wet your hand when you’re initially mixing the dough and performing the fold. This will minimize sticking and make the process much easier.
- The dough is “folded” one time, about an hour after mixing, to develop the gluten and give the dough some structure. No kneading in the traditional sense is performed.
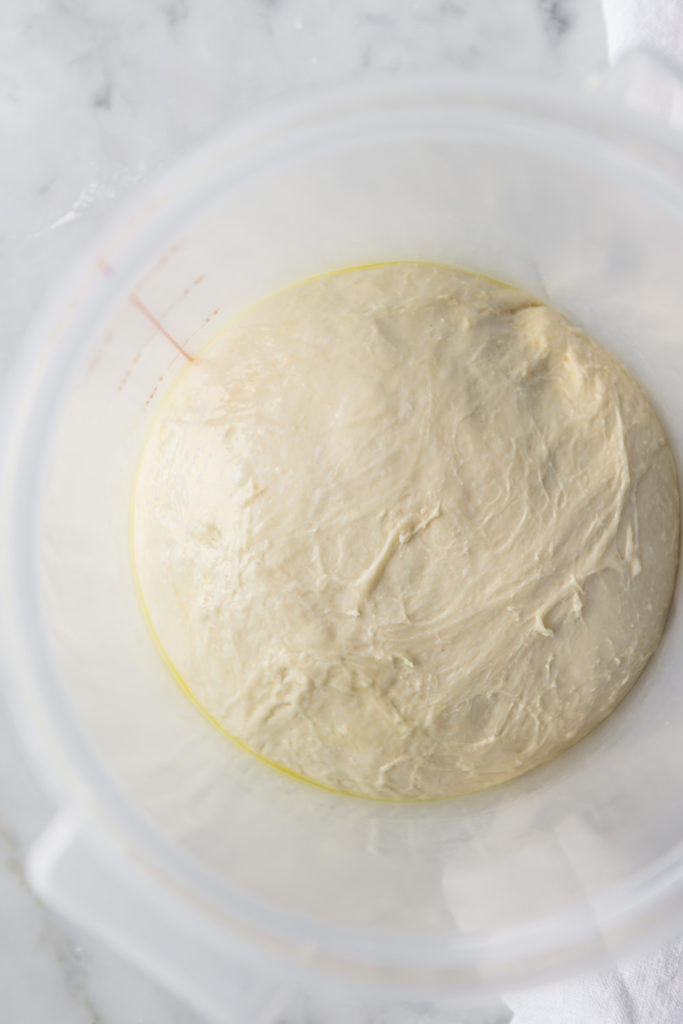
- Lightly grease the bulk fermentation container to prevent sticking. Also make sure to lightly grease the shaped dough balls and the plate they’re stored on. This prevents a dry, tough skin from forming on the dough as it proofs, and it also minimizes sticking (especially if you plan on refrigerating the dough for a day or two).
- Water temperature and ambient temperature play a very important role in the timing of the bulk fermentation. Cooler temperatures cause a slower fermentation and a longer rise time, while the opposite is true for warm temperatures. In general, it’s best to watch the dough rather than the clock. Follow the loose timing guideline in the recipe, but make decisions based on how the dough is rising in your specific environment. To learn more about manipulating temperatures and to hone your bread skills, I highly suggest reading Flour Water Salt Yeast by Ken Forkish. I’ve adapted his bread techniques here and in a number of my favorite bread recipes-- he’s the king of artisan baking.
- Here’s a great video on how to shape the dough into a ball. You want to create enough tension that the ball holds its own shape, but you don’t want to overwork it and lose much of the gas that has built up.
- make the best homemade pizza sauce for the ultimate artisan pizza!

Watch our web story here to see how to make this pizza dough!
how to make this artisan pizza dough ahead of time:
This pizza dough can be made, shaped into a ball and refrigerated for up to 2 days. It couldn’t be easier to make pizza for a crowd when you have your dough all ready to go.
Example timeline:
9:00 AM: mix flour and water
9:30 AM: mix in yeast and salt
10:30 AM: fold dough and transfer to lightly oiled container for bulk fermentation
3:30 PM: divide and shape dough into balls. Cover tightly with plastic wrap and refrigerate until ready to use. It could be later that evening for dinner, or anytime in the 2 days that follow. As a bonus, I find the chilled dough is easier to work with!
how to refrigerate pizza dough:
- After shaping the dough into balls, coat them lightly with olive oil and place on a greased sheet pan or plate.
- Cover tightly with plastic wrap.
- Refrigerate for up to 2 days.
- Shape dough for pizza, straight from the fridge. There's no need to wait for it to warm up: just shape, assemble and bake!
how to freeze the pizza dough:
This pizza dough can be frozen for up to 3 months. It's best to freeze the dough right after shaping it into balls (through step 4).
- Line a sheet pan with parchment paper. Lightly grease the paper and the dough balls, then cover loosely with plastic wrap. Freeze overnight.
- Wrap the frozen dough balls in plastic wrap and store them in a resealable plastic bag.
To thaw, transfer the dough balls to a sheet pan and defrost, covered, in the refrigerator overnight. This is the easiest and most fool-proof method.
Alternatively (if you forget to thaw them overnight), you can also let them thaw at room temperature. This should only take a few hours. Make sure to return them to the fridge when they've thawed and keep them refrigerated until you're ready to make pizza.
Note: this is my least favorite way to thaw the dough. It is easy to forget about the dough, and you risk over-proofing it.
how to make this pizza dough for a crowd:
This artisan pizza dough can be halved, doubled, tripled-- you name it. The recipe scales very easily, as long as you have a container that can accommodate the mass of dough.
We have big eaters around here, so I typically assume 1 dough recipe will feed 2 people with some leftovers for the next day. That’s 1 pizza/ person.
For smaller appetites, or if you’re serving the pizza with a salad and other dishes, you can get away with 1 dough recipe (2 pizzas) for 3- 4 people.
my favorite tools for making this crispy crust pizza:
Digital scale: This is the best way to guarantee consistency and great results. Everyone scoops flour differently, and flour itself varies enough to throw off volume measurement quite a bit. I’ve approximated volume measurements, but it’s really just an estimate when it comes to baking.
6-quart polycarbonate tub: I love this tub. Six quarts might seem a bit large, but it's the perfect size for a double batch of the pizza dough. Once you'd tasted this crispy pizza dough, you'll know why doubling is a good idea. Just freeze the extra dough balls and stash them away for a rainy day. The process is the same, why not?
Pizza peel: My favorite part of this pizza peel is the thinness of the paddle. I can easily slide it under a molten hot pizza and scoop it out of the oven. It's also 16-inches wide, which is perfect for a dough ball. If you've gotten good at shaping the dough, you'll need more space than a 12-inch paddle can provide. Finally, the handle can be removed so you can store it in a normal cabinet!
Baking steel: Simple, effective, low maintenance, and basically indestructible. This steel soaks up so much heat from the oven, so you get a super crispy crust. It's so much thinner and less obtrusive than a pizza stone-- I just leave it in the bottom of the oven!
more pizza recipes to try!
hawaiian pizza with caramelized pineapple
caramelized fennel sausage pizza
artichoke pizza with spinach parmesan cream sauce
stuffed focaccia with mozzarella and pistachio pesto
keto deep dish pizza with stuffed crust by Cassidy
Printartisan pizza dough- crispy, chewy, bubbly crust
This artisan pizza dough will give you a billowy soft and chewy crust, blistered bubbles and a crispy bottom. It uses a high hydration and long fermentation time for maximum flavor.
- Prep Time: 20 minutes
- Cook Time: 8 minutes
- Total Time: 8 hours
- Yield: 2 12-inch pizzas
- Category: Pizza
- Method: Bake
- Cuisine: American
Ingredients
- 500g (3 ¾ cups plus 2 tbsp) all-purpose flour
- 375g (1 ½ cups water plus 2 tbsp) warm water, divided
- 1g (¼ tsp) active dry yeast
- 10g (1 ½ tsp) fine salt
Instructions
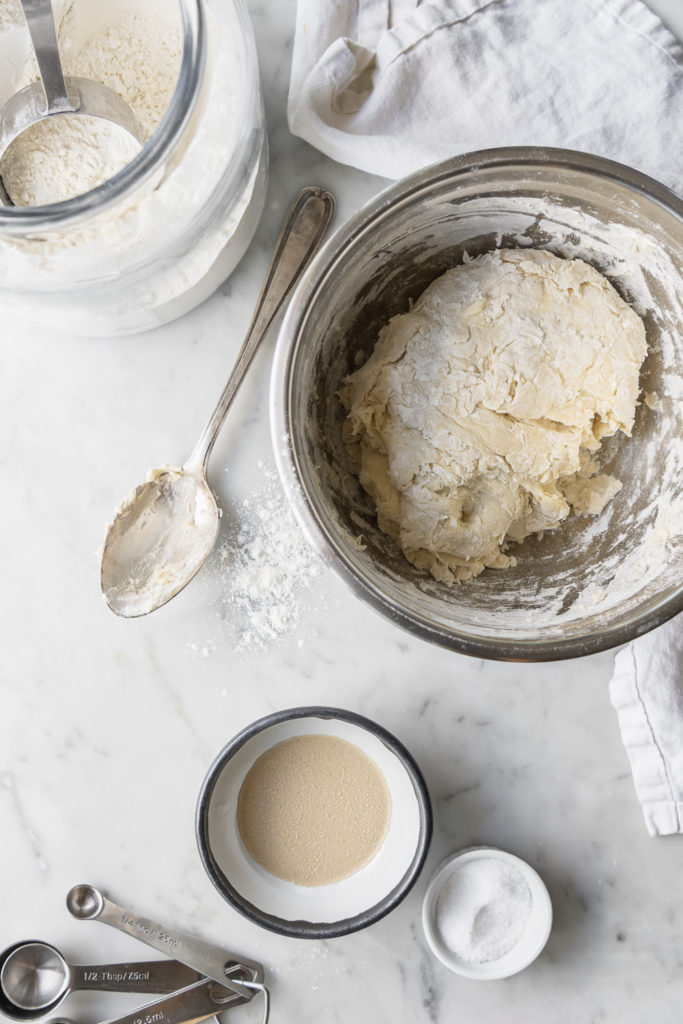
- Mix flour and all but 1 tablespoon of the water in a large bowl until just combined, then cover and set aside for 20 minutes to rest. Sprinkle yeast over remaining warm water and set aside to dissolve.
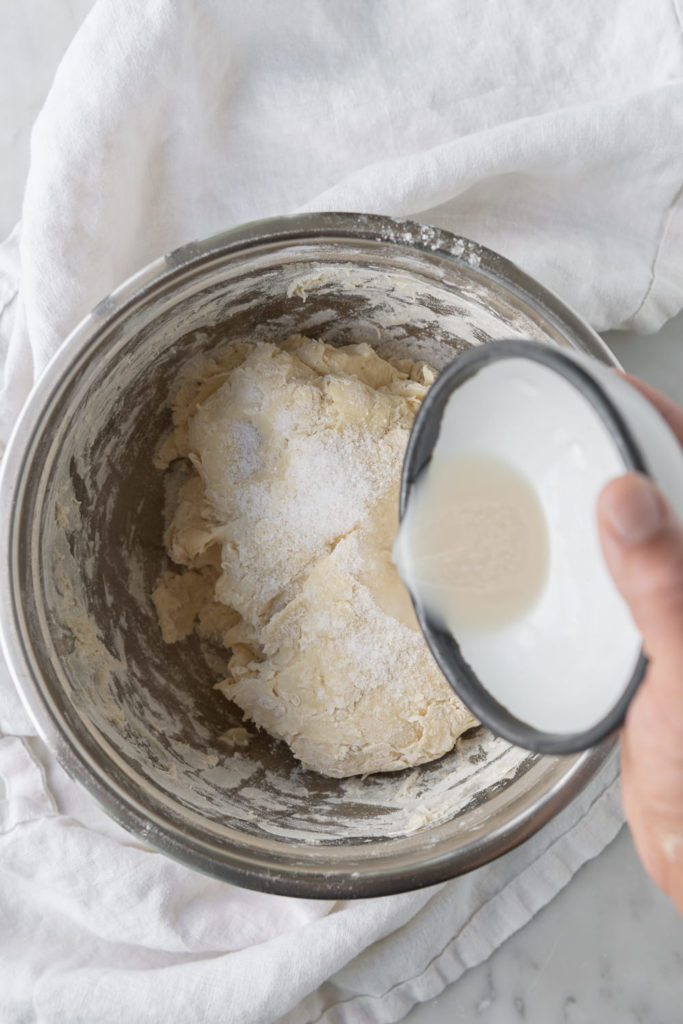
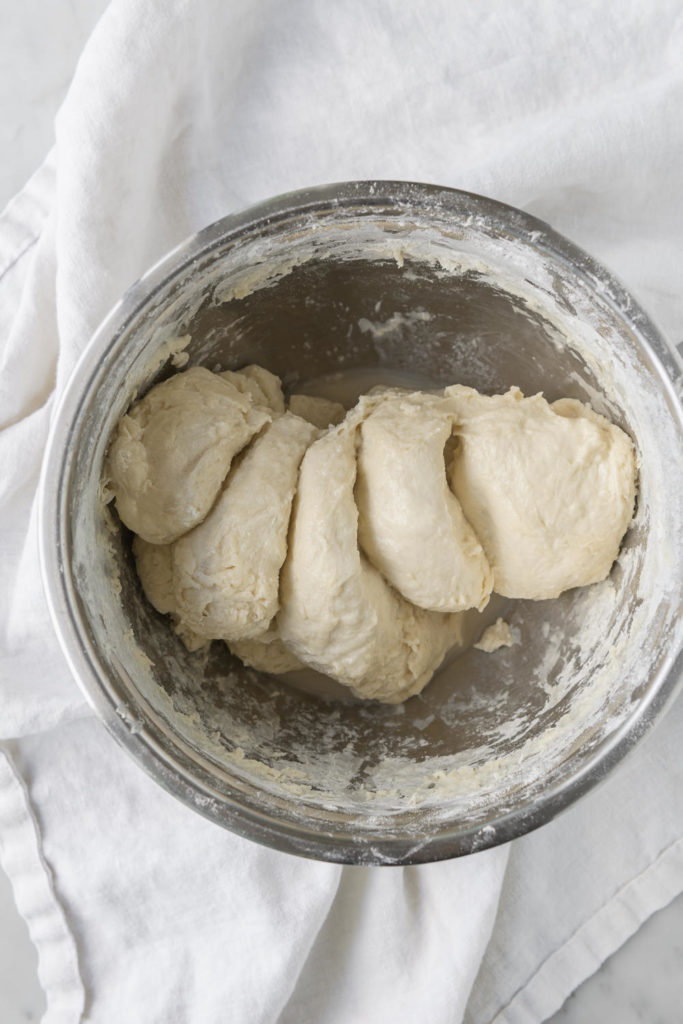
- Sprinkle salt over the surface of the dough. Stir yeast mixture and pour over dough. Fold the dough: lightly wet your hand, reach under the dough, and stretch a section of it over the top. Repeat until the center of the dough is covered. Then, using your thumb and fingers as pincers, squeeze and pinch off 5- 6 chunks of dough. Wet your hand to minimize sticking. Fold the dough over itself a few times. Repeat pinching and folding until the yeast and salt are fully mixed and a shaggy dough is formed. Cover the bowl and lest rest about an hour.
- Fold the dough one time to develop the gluten: lightly wet your hand, reach underneath the dough and stretch up a section of the dough, then fold it over the center. Rotate the bowl and fold four to five more times, or until the dough has tightened into a ball. Take the entire ball of dough and invert it into a clean, lightly greased bowl, so the seam is down and the top is smooth. Cover and let rise until doubled in volume, 5- 6 hours.
- Turn the dough out onto a floured work surface and cut in half. Working with one piece of dough at a time, shape into a ball as follows. Stretch out a quarter of the dough just until you feel resistance, then fold it back over the center. Repeat stretching and folding the remaining three edges until the center is covered and a loose ball is formed. Turn the ball over so the seam is down and place it on an un-floured area. Cup your hands around the dough and gently pull it towards you, dragging the bottom along the counter to create a bit of tension. Rotate the ball 90 degrees and drag it a few inches towards you again. Repeat rotating and gently dragging until the top of the dough tightens up and the ball is round.
- Transfer to a greased plate and repeat with remaining dough. Lightly oil the tops, cover and let rest at room temperature for about an hour. Preheat oven at this time. If not using right away, cover tightly with plastic wrap and refrigerate until ready (for up to 2 days).
to make pizza:
- Place pizza steel, stone, or inverted baking sheet on the middle rack of the oven and preheat to 500°F (or as high as it will go). Let oven heat up for at least 45 minutes. Generously flour a pizza peel and set aside. Alternatively, lightly grease a cast iron pan with olive oil and set aside.
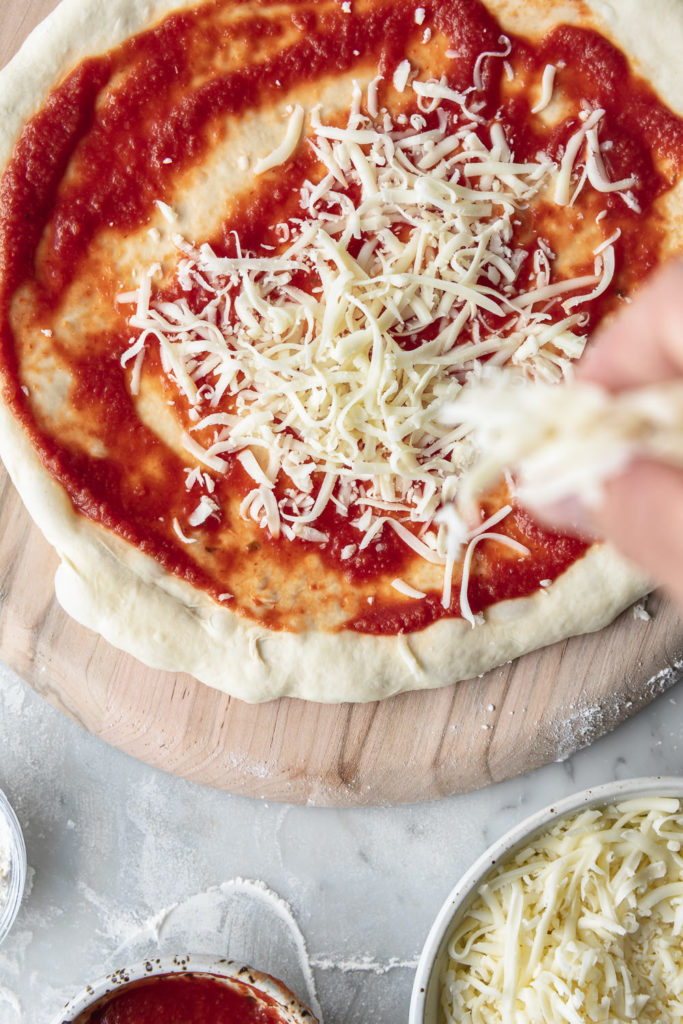
- Place one dough ball on a floured surface and flatten the middle into a large disk, leaving a thick 1-inch lip. Pick up the disk, and holding the thick edge, use gravity to gently shape the dough into a 12-inch circle. Lay on prepared pizza peel and adjust shape into a circle. Jiggle the peel to make sure the dough isn’t sticking, and add more flour if it is. Alternatively, shape the dough to the size of your prepared cast iron pan, then place it inside.
- Add sauce and toppings to pizza dough, leaving the 1-inch perimeter empty. Slide pizza onto the hot steel and bake for 5 minutes. Turn on the broiler and broil for 2- 4 minutes, or until cheese is melted and crust is golden and blistered. If using the cast iron pan, bake for 15- 20 minutes and broil for the last few minutes to get spots of char. Repeat with remaining pizza dough and toppings.
Notes
Recipe technique adapted from Flour, Water, Salt, Yeast by Ken Forkish
Nutrition
- Serving Size: ¼ of a 12" pizza
- Calories: 228
- Sugar: 0.2g
- Sodium: 488mg
- Fat: 0.6g
- Saturated Fat: 0.1g
- Unsaturated Fat: 0.4g
- Trans Fat: 0g
- Carbohydrates: 48g
- Fiber: 1.7g
- Protein: 6.5g
- Cholesterol: 0mg
Paul E. says
I literally never comment on recipes but this was too good not to. I've tried several different pizza crust recipes and they were just "ehhh". This was perfectly crispy and charred on the outside and chewy/fluffy/airy on the inside. My only difference was I was out of AP flour so had to substitute bread flour but was still perfect. Also i preheated a big cast iron skillet to 500 and baked about 7 minutes
Indi Hampton says
This made my day! I'm so glad you loved the pizza dough!
Beth says
Hello,
Did you happen to notice that when increasing recipe size the only measurements that increase are the metric? Thank you for this recipe, I use it every week and love it!
Indi Hampton says
Yes I did, it's so annoying! Sorry for the inconvenience there. I'm so glad you like the recipe though!!
Kim says
Hi,
When you say the only measurements that increase are metric, what did you mean by that? I just doubled the recipe and I’m wondering if it will turn out! Thanks!
Indi Hampton says
Hi Kim! Sorry for the delay-- I hope it turned out great! It was a tech issue on the recipe card, but I removed the feature a while back so it wasn't confusing.
Gary says
I have tried this several times using 500g 00 flour and 375ml of water but my dough appears much wetter than your photos and videos. Should I add some extra flour?
Kevin says
I like the idea of that it uses less yeast. Some recipes use 4 times more 7 to 8 g per 2 cups of flour. So I take it their after a super fluffy and chewy crust?
I like Artisan bread so...and the yeast isn't super cheap or want tons of in my dish. Still trying to find a great one for in a cast iron pan pizza. I found it really touchy on how very small changes in ingredients will make the crust turn out . Then it will be non gluten for me soon after, anyway. Thx, try soon.
Indi Hampton says
They're usually after a quicker rise time-- adding more yeast from the get go will just help get the population numbers up faster, for a quicker fermentation. In our case, it takes longer to build the yeast population up enough for the dough to rise, but in that time we also get more flavor development.
Kevin says
Great. I was on a leftover dough recipe, during the weekend I had such different results with crust. Just learning. I wasn't setting oven temp high enough. I like the cast iron pan it turns out round, Everytime. 2 minutes on Max stovetop, then put in 450 oven right away. Finally turning out. Won't be long now I know your recipe should turn out great thank you
Carol Boehm says
I'm in the process of making it. I had to add a bit more flour because my dough was very stickey and soft (and I made it exactly as the recipe states) It was sticking all over my fingers. I hope it turns out okay - I have it raising for the 6 hours now so we shall see. I really hope it works out because it looks amazing and I am an accomplished baker.
Indi Hampton says
Hi Carol! It is very sticky, and that will happen. It's helpful to wet your hands a little bit when you work with the dough, which is the opposite of what we're all used to doing. As the dough hydrates and rises, it becomes less sticky, but it is still very different from "normal" bread doughs!
Brian Colton says
I was very surprized by the small amount of yeast in this recipe, that I baulked at it and added three times the yeast called for the first time I made the dough. I was also in a bit of a rush, as I was given a pizza oven for my birthday. I'm retired, I should know better to make time!!
My second attempt, and knowing I needed more time, I added a gram and a bit of yeast, and the product was great. I found the dough to still be rather sticky on the hands and getting a round product required a certain amount of extra flour on the board, as it kept springing back. Any thoughts on how to decrease the "stickiness"?
Indi Hampton says
That's just the nature of the beast! I find it helpful to lightly wet my hands before mixing and folding so it isn't as sticky.
Carol Boehm says
it did turn out well and it was very good. I am making it again this weekend. Thank you
Indi Hampton says
Thanks so much for sharing!
Carol Boehm says
can this dough be used to make calizones too?
Faith says
Hey Carol. This is your sister in Georgia….send me a slice!! 🤭
Sara says
Hello,
I've made this several times and it's always amazing but I'm curious if you can premake the pizzas and freeze them raw with toppings? Will it affect the texture too much?. My husband is a pizza fiend and he's always looking for frozen pizzas at night lol! Let me know if you think that would work
Indi Hampton says
Hi Sara! I've never tried it but you aren't the first person to ask!! I am totally going to run some tests and see how it goes. I think I would start by freezing the crust plain and then adding sauce and toppings and freezing again, then wrapping it super tightly with plastic wrap. My thoughts there are just to prevent it from getting too soggy from the sauce while it freezes. I'll let you know what I find!
Sara says
I just tried it today with a small portion of the dough for a personal pizza and it turned out great!! I will take yoir advice and flash freeze the dough before I add the topping next time, but it was still crunchy and bubbly throughout. A total gamechanger for me.
Indi Hampton says
Whoa that's so great to know!!! Thank you for sharing it! I need to get on some flash freezing tests-- it would be a game changer for us too!
Chantal says
I freeze left overs ALL the time and they are very good reheated 😋
Indi Hampton says
Yes!!! SAME!
Leanne Combs says
I have pizza flour does the recipe change?
Don says
Best pizza dough recipe. I have tried many. Gracias mucho. Pura vida.
Indi Hampton says
Thank you!!
Darlene Frisicaro says
By far the best pizza dough recipe ever! Made it many, many times. Sometimes I increase the yeast to 1/2 tsp and let the dough rise for 4 hours, when we are crunched for time. Still great!
I have a question though…can the salt be added to the flour and water at the very beginning? Before the 20-30 minutes that it rests? Just wondering why it is added after you incorporate the water with the flour. Wouldn’t it be easier to add sooner? I’m sure there is a reason, wondering what that is.
April Boyer says
Salt slows a rise - that's why you add it later. 🙂
Nicole says
I 100% agree! So good!!
Jason Conlon says
This recipe was a lot of work compared to several other "best pizza dough" recipes I found on google but after tasting this - omg - the other recipes are a joke. This is the holy grail pizza dough recipe I have been looking for. I know it will get easier as I get used to making this more often. I used King Arthur organic bread flour. I also discovered that freezing this raw dough after the final rise and then thawing overnight in the fridge works just as well with no quality reduction.
Indi Hampton says
I'm so happy to hear you loved this pizza dough! It really does get easier once you get used to working with it. Freezing is a great idea!!
Sharon Gallant says
First time freezing, hope I did it right. After shaping into balls I froze it without the final rise is this correct.
Indi Hampton says
Yep, exactly!
Tammy Barganier says
Best and easiest pizza dough I’ve ever tried and I’ve tried many! Thank you so much for it. Never making pizza without this dough ever again. Light, chewy, great air bubbles, crispy. Just perfect!
Indi Hampton says
Thank you so much!!
Linda L says
This is an amazing pizza dough recipe , letting the flour mixture rest and adding the yeast bloom later made such an amazing crust came out beautiful light fluffy and airy and so very easy , The hardest part of this recipe is the long rise : ) .. love it
Thank you !!
Indi Hampton says
Thank you so much! The waiting is the hardest part!
Deanna says
Had this pizza dough this weekend - it was amazing!!
Indi Hampton says
So happy to hear that! It's a great dough!
Kk says
Can this recipe be used to make sub rolls?
Indi Hampton says
I'm honestly not sure, I've never tried it as anything other than pizza or focaccia! I'm leaning towards no, because it's a very slack and wet dough that only gets one fold to develop the gluten. I just don't think it has enough structure for a roll type of bread.
Bryn says
Great recipe!! I’m thinking about letting the second rise go longer, say to six hours….thoughts?
Indi Hampton says
Totally fine! Temperature also plays a role-- the fermentation goes slower if it's cool in your house, for example. Just watch it and play it by ear.
Missy says
Yep! I made pepperoni cheese rolls with it - to die for!! Making garlic knots tonight!! After I roll them I dip them in melted butter then place in pan- let them rise a bit afterwards then bake
pol says
I really wish you have a video demonstration for this recipe ;( English is not my first language so I don't think I can follow some of the steps in the recipe because I can't understand them. Still going to try though!
Indi Hampton says
Oh that's a great idea!! I'll make one in January!
Jeya says
This is my current favourite recipe for making pizza! It was as bubbly and billowy as promised... so worth the wait. Also looked like I pulled it out of a wood oven post-broiling! I just substituted bread flour for 00/regular flour.
Thank you so much for posting this and for the detailed instructions, Indi!!!
Indi Hampton says
I'm so happy to hear this!! The broiling part is the best!
Rachael Sana says
Hi! I plan on making this asap, jw what rack of the oven should I cook the pizza on?
Indi Hampton says
middle!
Rachael Sana says
I made it! And it's better than ANY pizza we've ever had. I made it trying to replicate brick oven pizza and it's perfect! My family loves it. Have you ever used this dough for calzones? Would i need to make any modifications?
Indi Hampton says
Yayy that's awesome!! I've never tried it with calzones, but I don't see why it wouldn't work. The hardest part would be shaping them, since it's such a floppy dough. Worse-case scenario, it turns into a messy folded over pizza thing-- it should still taste delicious 🙂
Sophia says
I hate it, just kidding I love it it is very fluffy and soft, it is the best
Indi Hampton says
hahaha yayy!!
Deanna says
This turned out wonderful! Great recipe!!
Indi Hampton says
so happy to hear this!
G says
I’ve been searching for years and I found it! This is the first at home pizza recipe that I felt compared to my favorite pizza places, thank you so much!!!! This was also the first post I saw on your blog, can’t wait to check out the rest 🙂
Indi Hampton says
Yes!! I'm so happy to hear this!!
Flora says
I bought a pizza stone to try this recipe. The flavor and texture is amazing. I let it sit over night and it was so good. I did have trouble manipulating the dough. It would be great if you did a video showing how you shape it!
Indi Hampton says
It is a tricky dough to work with, but so worth it! I'm planning on making a video in the next month or so-- I hope that will help. It also just takes practice, so keep using that new stone!
Jeanne says
Oh!! I am REALLY looking forward to the video!!!! This looks amazing!!!!! PLEASE MAKE THE VIDEO!!!! 🥰
Indi Hampton says
I totally will!! it'll make it so much easier!
Cynthia Wade says
Just made it today. I want the video also...........but I did my best..........took my time....and time is what you need.....but let me tell you. I was the best crust I've ever tried to make. Light, air bubbles........crispy on the out side and soft and chewy on the inside. YUMMY!! I'd try it if I were you.............and think about it..........if it doesn't turn out ...........you've only wasted a little flour and some yeast.
Haley says
This recipe in particular could really use a video in how to work the dough properly.
Cindy says
Please make the video. I didnt understand the one fold and then the pinching chunks??.and do what with them? I did my best and I'll try my creation later today. Just hoping it's what I'm expecting, but I'd appreciate watching a video.
Cynthia Wade says
OMG!!! This morning I didn't feel real confident in what I was doing eg.... pinching....folding.... we need that video 🙂 Apparently I didn't do bad cuz...........this dough was sooooooooo good.........just what I was looking for. Made my day!! yummy, yummy, yu mmy. It was so good my husband said .......well we never need to buy another pizza. lol ..lucky me 🙂 He absolutely loved it. Thank you. How long will the spare stay in the fridge?
Indi Hampton says
Ah I'm so happy to hear this!! I know, the process is simple but it's a lot words that will make so much more sense in a video. I'm so glad you stuck with it!!
Cynthia Wade says
Indi, I made the dough for the second time today. The dough tasted good but this time I didn't get any bubbly pockets and it was a little more chewy. Any idea what I did wrong??
Indi Hampton says
Do you think it rose enough? I find it can take a really long time if it's cool inside-- this time of year I tend to park it near the fire or a warm oven. That's the only thing I can think of!
Michele Bayko from Ohio says
This was an amazing recipe! Nothing new with the ingredients BUT the processing of the dough created the best homemade dough I’ve ever had (or personally made). Thank you...THANK YOU for sharing!
Indi Hampton says
Thank you!!!
Kristen says
One of my favorite pizza dough recipes yet. We love the chewy, bubbly, flavorful crust. Well worth the time and effort. Thank you! Question: if using from the fridge, do you bring to room temperature first or use cold?
Indi Hampton says
I'm so happy to hear this! No need to bring to room temperature-- just shape, top and bake! I find it's easier to shape when cold, too, so it's a added bonus 🙂
Kristen says
Wonderful. Thanks so much! A fantastic recipe.
Missy says
10 stars! I've made this many times and the more you make it the better you get! First couple times my technique was off bc it is a sticky dough! Don't be tempted to add more flour otherwise you will get a heavier crust! Tip!Wet your hands often! I also tried to make it in my KitchenAid - mistake! It just wasn't the same! Good luck practice makes perfect
Jim Starr says
Made this last month and turned out great but was very wet. Pizza was awesome, crust was chewy and crispy like we live it. Decided to make again today and was thrilled that you now have the video up. Makes it much easier to see how wet it should be. Can’t wait until tomorrow to cook it, I’m sure it will be even better! THANKS SO MUCH fir keeping your word and uploading the video.
Best pizza crust ever!
Indi Hampton says
Of course!! Yes, it is a super wet dough-- it definitely takes some getting used to. I'm so glad the video helped you!!
mimi says
Hi Indi----I have searched for a dough that looks just like the one in your (new) video...and have finally found it! Your intstructions in the video were easy to follow and since I am a visual learner, made much more sense to my brain that just reading the instructions. Thank you! Question---If I want a bigger pizza than my stone provides, can I use an aluminum pizza pan to cook it on and not the stone? Made my old recipe for dough tonight and even though it is good, it is not "the best". And I want to make it as close to your photo as I can. What kind of mozzarella did you use?
Indi Hampton says
Thank you! I don't see why that wouldn't work-- the only downside is the bottom of the pizza won't get as crisp as it would with a preheated stone/ steel. Just shape the dough on the aluminum pan, slide it in the oven, and add a few more minutes to the bake time! I used whole milk low-moisture shredded mozzarella. I hope that helps!!
Donna says
could you use whole wheat? Im a special diet that doesnt allow me to eat refined carbs.
Indi Hampton says
Probably! I've only tried it with 100% all-purpose, so I don't know for sure how it will turn out. Normally I would suggest starting out by substituting 25- 33% of the all-purpose flour with whole wheat. Since you don't eat any refined carbs, you could certainly try 100% whole wheat. It will be heavier and denser, and you won't get the same airy/ crispy texture. But you'll get a pizza dough!
Kelly says
Absolutely the best pizza dough recipe I have ever made. The crust was chewy and crispy and perfect. The video was exceptionally helpful; thank you!
Indi Hampton says
Yayyy thank you!! So happy to hear this!
Milena Gimenez says
Without any doubts the best pizza recipe I've tried. Over the summer I've gone through dozens of recipes in search of the perfect crust and this one won my heart. Takes quite a bit of time but it is oh so worth it. Thank you so much for sharing it, never imagined that googling "bubbly crusty pizza recipe" would get me such fine results. Greetings from Uruguay.
Indi Hampton says
Hahaha thank you!! So happy to hear this!
Rafael Cordano says
I could ask you what flour brand and type did you used? I am uruguain too but I don't get the correct dough texture.
Thanks.
Indi Hampton says
I love Bob's Red Mill and King Arthur!
Patrick Fegan says
Hi,
Most of the pizza dough recipes have some sugar or honey added.
Just wondering if this would enhance the flavour or why is there none added to this recipe?
Thanks
Indi Hampton says
I don't think it needs any added sweetness, but feel free to try with some! the fermentation is so long and slow, the dough develops a ton of flavor on its own.
Sara says
I’ve been looking for the perfect pizza crust—and This is it! So delicious and turned exactly like picture. Thank you so much for this wonderful recipe!
Indi Hampton says
thank you so much!!
David says
I found this dough precisely the texture I wanted. Living in Europe, I have access to flour milled specifically for pizzas -- 00 in Italy or a modified T45 in France. My dough had a wetter consistency than I see in the video. I use a kitchen scale when cooking, particularly with new recipes, and I measured exactly according to the recipe and followed the instructions exactly. I suspect that my flour contributed to the high moisture content of the dough. Being so wet, I found the dough quite difficult to work in the shaping phase (again, my dough had a much wetter texture than in the video), requiring the use of quite a bit of additional flour. My oven reaches about 265 degrees Celsius, and I baked my three pizzas (approximately 10 inches in diameter) on my cast iron comal. I preferred the one I baked for 12 minutes. My husband and I both found the efforts rewarded by the quality of the crust: the slices did not droop when held horizontally; the bottom had crisped nicely; and the cornicione (outer edge) had a satisfying crisp exterior, a beautifully soft, bubbly interior, and a delightful chewiness. I shall be making the dough again today with a couple of modifications: increasing the flour to 520 g (to reduce the wetness a bit) and increasing the salt to 12 g (since one eats more crust with this style of pizza, we though the crust could benefit from a bit more salt.) Also, I will let the dough ferment in the refrigerator for a day or two. I usually ferment my other pizza doughs slowly in the refrigerator for at least a day. The flavor develops much more from longer, slower fermentation, we find. My enthusiasm for this recipe find, however, led me to abandon my principles and bake this crust without my usual patience. I highly recommend this formula and method for making and baking a dough which results in a remarkably good pizza.
Indi Hampton says
Awesome! Thank you so much! And yes, I agree, I bet it was just flour variation that caused the dough to be extra wet. It is so much easier to handle when it's been refrigerated, so definitely give the long and cold fermentation a try!
David says
I settled on 510 grams of my pizza flour, Mon Fournil Farine à Pizza, and that worked a treat. I tried the refrigerator fermentation, and I, surprisingly, find that I prefer the "make it in the morning / use it that evening" approach. I admit to using a shortcut: I do the mixing in my KitchenAid with the beater attachment. I mix the flour, salt, and about 3/4 of the water until well combined. I let that rest for half an hour (covered by a kitchen towel), proving the yeast in the remaining water at the same time. I then mix in the yeast, re-cover with the towel, and leave it until dinner time. One last note: I learned about dough dressing from Domenic D'Angelo's little pizza book. Mix some sugar; lemon juice or vinegar; and oregano powder or Italian herb seasoning and/or optionally garlic powder. Stir until the sugar dissolves completely (use just enough juice or vinegar to dissolve the sugar). Using a staff mixer, mix in olive oil a little at a time until you get a somewhat sturdy emulsion. Brush this emulsion on the shaped dough before adding toppings or after baking or both. This dressing of the dough adds a bit of shine, aids in the browning of the crust, adds just a bit more crunch to the skin of the dough, and imparts a subtle enhancement to the flavors of the pizza. Again, thanks for this terrific addition to my pizza repertoire. I've had THE recipe for thick crust and THE recipe for crispy thin crust for years. Now I have THE recipe for puffy, airy, holey, chewy crust for which I've long searched.
Moy Young says
Hello David!
Thank you for your feedback!! I have followed this recipe in the past making pizza with "O" pizza flour; it was mind-blowing.
You seem like a pizza aficionado.
May you please share your recipe for your find on THE thick crust and THE thin crust pizza? I am trying to recreate the best homemade pizzas. Also for the dough dressing, may you provide the metrics (I, too, use a kitchen scale)?
Please, if you have any time, may you email me: [email protected]?
Warmly,
Moy Young
Dina says
Hi! I'm in the process of making this and very excited for the results after reading the comments! I had a question though... I want to make it ahead of time, for tomorrow's lunch. I mixed all the ingredients and let is sit covered for 1 hour. Can I now move onto shaping them into 2 balls and letting them rise in the fridge overnight, or do I have to let them rise first at room temperature and only then refrigerate them? That part got a bit confusing to me... Thanks in advance!
Indi Hampton says
Hi Dina! Just shape them into balls and refrigerate. Make sure to lightly grease the plate and the dough balls and then wrap tightly in plastic wrap so nothing sticks or dries out. They'll rise in the fridge! Then pull them out at any time in the next 2- 3 days, shape into a round, top with toppings and bake. I can't wait to hear how it goes!
Kathryn martinello says
I too found the dough quite wet and lacking in salt, however, it is the best pizza dough I have ever made.
Kathryn martinello says
I have tried several dough recipes, this is by far and wide THE best recipe. My family and friends raved about it. I am tossing all my other recipes in the trash. Thank you
Indi Hampton says
So happy to hear this!! Thanks for giving it a try!
Kathryn martinello says
So I made this recipe again today and it wasn’t wet enough???? It was actually quite dry. It was a new bag of flour but it turned out so differently from last week. Arrggg
Indi Hampton says
Hmm are you using a scale to measure your flour and water?
Kathryn martinello says
No. Should I? Thank you
Indi Hampton says
I would! weight is the most accurate method. if you're having trouble with consistency, that's the first place I'd start!
Nick says
Hey Indi...I noticed that measurements in cups do not scale when selecting X2 or X3 (only the metric measurements scale). This could be the issue if the person wasn't paying attention. Thank for sharing your recipe and tips.
Indi Hampton says
yeah, I need to figure out how to fix that. Thank you!
Kathryn martinello says
Thank you
Laura says
Boyfriend and i were jealous of our friends's outdoor brick pizza oven. We set out to try to make the best "oven" pizza we could. This dough recipe really upped our game--THANK YOU!! The texture was worlds different from my old dough recipe. We also started using our cast iron pot to cook it, which may have made a big difference as well. I was so empowered to be able to make my own artisan pizza.
Indi Hampton says
Yes!! That's so awesome to hear!!
chris Parsons says
Can you use live yeast? How much would you recommend?
Indi Hampton says
I've actually never worked with fresh yeast, so I can't say for sure. But it looks like it should be fine if you just double the amount. Let me know how it goes!
chris Parsons says
Tried it with normal yeast, wow!! Will try with fresh yeast next time and report back. Thanks, so good!
Indi Hampton says
awesome!! thank you!
Kathryn martinello says
Good morning Indi would you have a recommendation for a scale? Many thanks
Indi Hampton says
of course! I have this one and it's great! https://www.amazon.com/gp/product/B0007GAWTG
Mel says
Agree!
Daryl says
I've been making pizza dough for ages, but never really felt like my recipes achieved the crust I wanted. This one was a game changer for me. I don't comment on sites very often, but wanted to let you know how much I appreciated both the recipe and the detailed directions/video. Awesome pizza dough. Thanks much!
Indi Hampton says
thank you so much!!
Maria says
Great recipe! I'm currently on the step of the ferment. I will plan on making the pies tomorrow but I'm unclear on the refrigerator process.
Do I let it bulk for 5-6 hours before putting it in the fridge?
What do I cover with?
Do I news to let the dough rest once it comes out of the fridge?
Thanks!!
Indi Hampton says
Thank you! You're right, I wasn't very clear on the process! Sorry about that. I updated the post with more details, but yes-- let the dough bulk ferment, then shape into balls and refrigerate. I find it's best to coat the dough balls in olive oil (and the plate/ sheet pan you store them on) and cover tightly with plastic wrap. Hope that helps!
Jenny says
Hi, I’m using active dry yeast instead of instant yeast. Should I be concerned if it does not foam? Will the dough still rise?
Indi Hampton says
I'm sure it'll be fine. The yeast will only get foamy if there's sugar in the water to ferment (proofing). And to be honest, I don't really worry about proofing as long as I know the yeast has been stored well and isn't close to the expiration date. Here's a great article to learn more: https://www.kingarthurbaking.com/blog/2015/09/25/active-dry-yeast
Jo M says
It's our silver wedding anniversary soon and we don't do smushy anniversary stuff these days, LOL, so we decided to treat ourselves to a Roccbox pizza oven!! I've been searching for a great dough recipe (have made my own for years; its ok, but nothing great), and now at last I found you! Cannot wait for the Roccbox to arrive next week to test this out! Thank you for sharing!
Indi Hampton says
That sounds like the best anniversary gift ever!! This pizza dough won't disappoint!
Jo M says
Well Indi.. you are officially our favourite chef!! Our Silver Anniversary Pizza & Champagne night exceeded expectations!! This Pizza dough was the best we've ever tasted! I can't believe I made it myself! Heartfelt thanks for sharing this spectacular recipe - you've made this household extremely happy! xx
Indi Hampton says
Yayyy!!! Thank you!! What a special and fun way to celebrate!
Michael says
By far the best pizza dough for home oven I have ever made. I am going to use this to make some baguettes and rolls to see how they come out.
Thank you for sharing
Indi Hampton says
Amazing idea! I'd love to know how they turn out! Please report back!
Donna says
We got an Ooni pizza oven and have been making pesonal pizzas evey Saturday night for the entire pandemic! I discovered this dough a couple of months ago and tried to make it whole wheat but hoestly its better just as is. It is just perfect. We experimented with many over these past months but this is the one! I love the process too--it is super super easy and always always comes out right! Youve helped make our Saturday pizza nights so wonderful!
Indi Hampton says
I love hearing this! I really need to start personal pizza Saturdays in our house-- such a great idea.
Melanie says
I doubled the recipe and saw my dough was a bit too wet and sticky so i added a bit more flour and let it rise. The top of my dough was a little dried out after rising for 6 hours so I was worried but needless to say, the crust turned out amazing!! My go-to recipe and I'm glad I have 3 more left to store away for the future. This was such a foolproof recipe and tasted like the best crust I ever had. I impressed the family and thank you for sharing.
Indi Hampton says
So happy to hear this! it is a very resilient dough!
Paolo Masaro says
Finally after years of trial and error I found this gem, getting the fluffy in my pizza and someone who understands how important this is - i've been searching forever and its missing in every other recipe i've ever found!
I came back to this recipe after a while away and so excited to see the video. Very helpful in explaining the steps. I have shared this with many friends and family after they tried my pizza.
Indi Hampton says
I'm so happy to hear this!! Thank you!
Saroj says
Just came across this recipe and plan to try asap. Just one question before I do so, it's the amount of yeast, 1/4 teaspoon?
Thanks,
Saroj
Indi Hampton says
Yes! That is correct! It's a long fermentation, so it doesn't need much!
Deb says
How much water do you need for the yeast?
Indi Hampton says
Hi Deb! If you use instant yeast, you don't need any water-- just mix it in with the salt. If you use active dry, just pull 2 tbsp out from the total amount of warm water to rehydrate the yeast in. Either way works!
Steven Gregg says
Hi, I am looking forward to trying this recipe next pizza night. One question, have you tried substituting semolina for some of the flour?
Thanks
Steven
Indi Hampton says
Hi! I've actually only made it with all-purpose, but I'm interested to hear what it's like with semolina (or even bread flour)!
Jennifer Paige Williamson says
I made this recipe with the bread machine for the kneading/proofing, and it was awesome!
Thank you!
Indi Hampton says
oh that's so cool to hear that it works in a bread machine!! thanks for sharing!
Queene Greene says
Almost every Pizza dough recipe I've read indicates that salt kills the fermentation of the yeast. But, in your video you pour the yeast/water directly onto the salt. Help?
Indi Hampton says
Of course! If you left the yeast on the salt for a while, then yes the osmotic pressure would definitely kill some of it. Since we're mixing it all right into the dough, it doesn't really matter. Even if some of the yeast did die, there's enough yeast and the rise time is long enough that the population will still take off. So no worries-- it'll be fine!
rodney carswell says
I made this recipe yesterday for a small dinner gathering. Despite experience making pizza from scratch at home, I had a bit of a trauma getting the wet dough to slide off the peel and onto the baking stone. After I adjusted for this, the baking went pretty well. I followed the recipe to the letter throughout and my guests were very pleased with the results. I thought it came closer than anything I have done at home, to the bubbled, chewy and blackened crust one experiences from pro wood or coal fired ovens (really, you get "browned" not "blackened" crust bottom in a home oven, even at 550 degrees). The wet dough was easier than I thought it might be to work with (except for getting the peel slide technique down). Great recipe!
Indi Hampton says
Thank you! You really do have to be generous with the flour and do the "jiggle" check to make sure it doesn't stick-- I've had some traumatic experiences with that too!
Megan @ Salted Spoonful says
Hi! I made this dough once before and it was great! I’m now making it a second time and I’m just curious for more info on the folding & pinching process. Would we get the same end result from just dumping it on the counter and kneading? Or making it in a stand mixer with a dough hook? Making it per your instructions, I’m not handling the dough very much. Is there a reason for that? I feel like a lot of dough recipes I’ve made instruct you to knead the dough for several minutes to develop the gluten. Just curious! Thanks for a great recipe!
Indi Hampton says
Of course! I should add more background info about the process! But basically, there are different ways to develop gluten. This dough is similar to the concept behind the no-knead dutch oven breads. The hydration step in the beginning and the long rise time give the enzymes in the flour time break down the proteins (glutenin and gliadin). Gluten is then formed from those proteins much more efficiently, without much kneading required. The pinching/ folding to mix in the yeast and the final fold is enough to align the gluten strands (what we achieve with kneading). The key for it to work is the high hydration dough and time.
I think it would probably be fine all thrown together in a stand mixer, but you wouldn't get the hydration step (and if you did, it would be more effective to pinch in the yeast than use a mixer). So by hand is honestly the easiest! I hope that makes sense!
Gabriela says
Hi! Hope you're doing well. I haven't made the recipe yet, but I would like to know if I can freeze it raw and for how long (one or three months?). I've read the comments and I think it will be the best pizza dough I'll ever make! Thank you 🙂
Indi Hampton says
Yes you totally can freeze it! If you wrap it tightly, 3 months should be fine! I'm going to update my post with more details. 😊
anna says
So glad I tried this recipe, it is the best!
Video really clarifies things. Hubs and I don't care so much for red sauce on pizza so much. I used garlic confit mixed with some pesto, on this crust.....great pizza! Thank you!
Indi Hampton says
Thank you! The technique is so different from the way we usually think about making bread dough-- I'm glad the video helped you!
B smith says
I have being making pizzas both for leisure and professionally 8 yes and this is my now favorite dough to make. Come out just as described. Airy.. puffy.. chewy and great flavor. Anyone who tosses the crust… I highly doubt you will with this recipe. I left my dough in fridge for 2 days because I was too busy after the 24 hour rise to make one. So it was in my fridge balled up for 2 nights and made by noon that day. It came out beautifully.
A definite keeper and will continue to use.
Thank you for sharing this recipe.
Indi Hampton says
Thank you so much! I'm so happy you enjoyed it!
Sherie says
Indi let me start off by saying I am yeast challenge so having said that when the pandemic hit and cooking at home became the norm we started to make pizza at home our local store had artisan pizza dough in the freezer section well it was good until they no longer had it so I started looking for a recipe and came across yours I read all the comments watched the video several times well I started this dough at 5 pm and finished it at midnight. We had our pizza tonight and I will never buy pizza dough again. Thank you for a great recipe.
Indi Hampton says
Ahh I'm so glad you tried it and loved it!!
Tom Lynch says
Multiple trials of other recipes with mixed results. Just made 8 individual pizzas with 20-something y.o. nieces and nephews and they raved about the taste and texture and crunchewiness! Unbelievable results with overnight 6 hour rise, 8 portions balls before work today in fridge, warmed up this evening and 3 pizzas at a time on 550 degree stones in oven. They are all from New York City so they know what real pizza is!!!
Indi Hampton says
The New Yorkers are the true test! That's so great!
Stefanie says
Hi! I am planning on trying this recipe! Can the dough be frozen?
Indi Hampton says
Yes! You'll find directions on how to freeze it in the blog post above! Can't wait to hear how to goes!
Maria says
Hi! (sorry for my english speaking)
What is the amount of water for the yeast its is 1 tablespoons ou 2 tablespoons? Because ont the repipies its say: ''375g (1 1/2 cups water plus 2 tbsp)'' but on the instruction its say: ''Mix flour and all but 1 tablespoon of the water...''
I did the recipe i put 2 tablespoons of water for the yeast.
I made the recipe in grams exaclty i follow but the water was just way to much its was so so sticky that i have to put a alots of flour. I dont thing the grams is right & my mesure in grams is good no defect. I have not tested the pizza doug because i will make the pizza for tomorrow i hope its will still work.
Indi Hampton says
Hello! Sorry for the confusion! Just measure out 375g of water and scoop out about 1 tbsp for the yeast. The amount for the yeast isn't that critical-- we just don't want to add more than 375g total water to the dough. Hope that helps! There's also a video in the post that might help give you an idea of the dough consistency.
Maria says
Hi,
500g all-purpose flour, 375g water etc.....
What i wanted to say is that the gram measurements don't work well as the dough gets super too sticky so i had to add a lot +++ of flour. Next time i will take the measurements in a cup. Thanks for water 1 tablespoon and the yeast. yes I had already watch the video. I am going to cook the pizza today i'm sure the result will look good! This recipe is simple and i love it! The dough is easy to work.
Maria says
Wow awsum pizza!
I spread the pizza well but it was a bit difficult, but the result of the pizza was not thin but medium thick, even i had it stretched well but anyway it was delicious the dough was very well cook it's the best pizza i ever done! A super puffy pizza lol Thank's for the recipe!
Nadia says
Hi!! So excited to make this! Just a few clarifications:
1. If I plan to keep the dough in the refrigerator for up to 2 days, do I put each shaped dough ball in a separate plate (not bowl) and cover each plate tightly with plastic wrap? Was just thinking this might hinder it from "growing"? Lol.
2. If I plan to keep it in the freezer (for later than 2 days use), do I put each dough ball straight into the freezer after shaping them? (coated with olive oil + covered loosely) Then after keeping them overnight in the freezer, take them out again and wrap individually with plastic wrap?
Thank you so much in advance! This seems like a very promising recipe. Really can't wait to make it!! 🙂
Indi Hampton says
Hi! Yep, covering with plastic wrap is totally fine. They'll just relax out (vs puffing up), so don't worry about the wrap. Just make sure to coat them in olive oil to prevent a skin from forming and to prevent them from really sticking to the plate/ each other. I find it's easiest to spread them out on a sheet pan!
Yes to the freezing plan-- that's exactly how I do it and it works great! Good luck and report back!
Emma Harrington says
I have tried countless pizza dough recipes over the years and there is always something missing, until I found this one! I keep coming back. It is great for the oven or the grill. It gives you good chew AND crispiness to your crust. It is flavorful due to the long rise, so please do not be tempted to try to speed things along. It scales up very easily. Thank you for a great recipe!
Indi Hampton says
So happy to hear this! Thank you for trying it!
LeAnn says
I love this recipe! It makes the perfect crust! I have a question, just wondering what the purpose is for sprinkling the salt on top of the dough instead of incorporating it in with the flour.
Thanks
Indi Hampton says
Great question! A lot of things are actually happening during that first step of hydrating the flour and letting it sit. It’s broadly called “autolysis”, where enzymes in the flour are activated by the water and begin to breakdown proteins and starches. It helps gluten develop to minimize kneading, and it helps the dough become stretchier (which helps with those good bubbles!) Salt slows the enzyme activity and tightens the gluten, so it’s best to just add after the autolysis step along with the yeast.
Anyways-- hope that wasn't too complicated! I'm so happy you love it!!
Amira Ownbey says
I never leave comments, but as a big time pizza lover always trying new recipes, my search is over. This is the BEST pizza dough I've ever made. I've always tried to get the balance of chewy and bubbly crust and this is it. I used regular AP, let the dough rise in my oven on "proof" mode, and let it rise overnight for its last rise. I always bake my pizzas at 500, but I'm going to try a higher temp next time to see if I can get it a little crispier. I will also say this recipe makes 2 large pizzas with a thicker crust, so I may even divide this by 4 to get a thinner, Neapolitan style crust next time. Thank you Indi - great recipe!
Indi Hampton says
Thanks so much! So happy to hear this!
Chris says
I have had a pizza oven for more than10 years and have tried at least 10 different dough recipes each year and none have come out as perfect as this one. Thanks so much for sharing such a treasure. Another bonus is we could get the dough ready hours ahead and be cruising by the time everyone arrived for the party. All the very best to you!
Indi Hampton says
That's SO great to hear!! I love how flexible the timing is with it, too! It can hang in the fridge for a few days, no problem. Enjoy!!
Sandra says
This is the best pizza dough I've ever made. My boyfriend kept saying, "So you can make this again, right???" I only had time to follow steps 1 to 3. Then I split it and put it in ziplock bags overnight. It was chewy, bubby, crispy ... perfect. My search for the perfect pizza dough is finally over. Thank you for this amazing recipe!
Indi Hampton says
Ahh thanks for sharing!! I love hearing this!
Michelle says
I've Made a lot of pizza for my husband and I and we've been looking for a better pizza dough. I happened upon this one and made it tonight. Best recipe ever!! We've finally found the best ever pizza dough recipe!! Well worth the extra effort! Thank you so much!!
Indi Hampton says
Ahh thank you so much for sharing!! I love hearing this!
Alena says
Thanks a lot for the recipe! I made pizza today, it's amazing!
Indi Hampton says
Thanks so much!!
jules says
good morning
why in recipe cups of flour and water are the same for the 3 recipe
Indi Hampton says
Hello! Unfortunately it's a bug in the recipe card. You'll have to just multiply the cups if that's the measurement you're using.
Hilene says
Good day, I made my dough yesterday, and are making pizza's today. Can I pre-bake the bases? How will I ho about doing that? Temp and time? Thank you so much for your recipe!!
Indi Hampton says
Thank you so much! I've actually never tried pre-baking. It it probably best not to, but I do also understand wanting to get them all shaped and ready (or freeze them). I just have a feeling they will get too hard and crunchy when you re-bake them with the toppings, and they might also puff up too much during the pre-bake (with no toppings to weigh the center down). Sorry I'm late and not that helpful! Let me know if you tried it and what happened-- I'm curious now.
Suzanne says
I love this crust and it gets rave reviews! Question for you...I recently inherited some sourdough starter and have been making a no-knead dutch oven bread (you referenced this above). Do you have any idea of whether or not I can substitute the starter for the yeast in your recipe and if so, how much? I think I can figure out how to tweak the recipe but just not sure how much starter to use. I appreciate any insight you could offer. Thanks!
Indi Hampton says
Hi! Thank you so much! You could absolutely use a starter for this dough-- I'm just not sure how much would be appropriate. I don't have enough experience working with sourdough to really say how to calculate the quantities! Let me know what you try!
Maggie says
This pizza dough turned out amazing!! Exactly what I was looking for. Thank you!!
When defrosting the dough in the fridge do you leave it wrapped in the plastic until ready to shape the dough? Or place it in a bowl and cover with plastic wrap?
Indi Hampton says
I usually transfer the frozen dough balls to a lightly greased sheet pan and cover the whole thing with plastic wrap, that way they mostly keep their round shape and are easy to peel off!
Jill Whigham says
Excellent!!! My husband and I have been experimenting with pizza dough for years and finally this is it! Great video, very helpful. Thanks! 😊
Indi Hampton says
So happy to hear it!!
Susie says
Can't believe how awesome this pizza dough recipe is. Definitely found my new go-to.
So exciting taking the pizzas out and them looking like they'd been in a real pizza oven!
Indi Hampton says
Thank you!! Yes, doesn't the crust just look so good?!
Ali says
Really good pizza dough recipe! I didn't ha ve time to let it ferment for long and it still came out good. Nice and chewy.
Indi Hampton says
That's awesome! It's so flexible!
Steph says
Hi Indi, thanks for taking time to share this lovely recipe with us. I think it’s great. I have made it a few times, but my results were very inconsistent and I realised why now. The scaling of the recipe isn’t working correctly. 1 1/2 cups water for 3 x dough isn’t right. You might want to fix that, but otherwise this is great chewy pizza dough. I love it when it has worked.
Indi Hampton says
Oh I'm sorry about that! I need to figure out how to fix the app. Thanks for the heads up!
Steve McGuigan says
I have searched long and hard to fins a pizza crust that is like my favorite pizza shop and this is it! It is light and airy with all the bubbly goodness a great pizza crust has,
No more bread maker doing dough in a couple hours!
Apparently, good things come to those who wait, and if you are willing to put in the time and effort, this is the best pizza crust you can make at home,
Indi Hampton says
Thanks so much!!
Brock says
Hi,
This recipe looks amazing and based on the comments it is!
I am going to try to make it and I have two questions:
What are the measurements of active dry yeast instead of instant yeast?
If time is of the essence, can the 5-6 hour proofing process be sped up by using the proofing feature in an oven? I understand that the long process helps develop the flavour but time isn't always available.
Thank you and I can't wait to try this recipe!
Indi Hampton says
Hi Brock! You can use instant and active dry yeast interchangeably, and you can actually skip the yeast hydrating step in the recipe if you have instant yeast and just mix it right in with the salt.
You should be able to use the proofing feature on the oven. I've never tried it, though, and I'm not sure how much it will speed up the process-- we only start with 1/4 tsp yeast, so it will take them a while to build up a solid population. But it's worth a try! Let me know how it goes!
KA says
I've been trying many recipes over the last few years' pizza nights to get the crust right and yours has finally nailed it! Thank you so much. Chewy, delicious!
Indi Hampton says
Thanks so much!!
Dawn says
Gonna try this recipe, but I have a question. If you are hydrating the yeast before adding to the flour, why would we use Instant Yeast? Should my standard active yeast work as well?
Indi Hampton says
Yes, you're totally right. In my mind, active and instant yeast are basically the same thing at this point, but it was dumb to write that! You should honestly be able to mix instant yeast right in the dough, along with the salt (make sure to use all of the water for the flour hydration step). If you have active dry, proceed with the recipe as written! Sorry about the confusion! I'm changing the recipe right now.
Elizabeth Tchakarov says
Thanks for the recipe! If you put dough in fridge, do you have to wait when u take it out and before you make the pizza?
Indi Hampton says
Nope, just pull it out, shape and bake! It's honestly a lot easier to work with when it's cold, too!
Bethany says
I have a question, all I have is a cast iron or just a regular pizza pan, if using the cast iron, I’m assuming I should preheat it? If I just use the pizza pan will I just risk losing the Crispiness?
Thanks! Can’t wait to try it!
Indi Hampton says
Hi! Yes, preheat the cast iron if you want to use that. Sliding the pizza dough onto it is always a little sketchy, but the crust will be worth it! And I've actually never used a pizza pan, but if it's something you just assemble the pizza on and then slide in the oven, it will be less crisp. Try both and let me know!
Catherine says
Wow, this recipe turned out beautifully... perfect, light, airy, crisp outside crust! Thank you for sharing!
Indi Hampton says
Yayy I love hearing that! Thanks for sharing!
David E Wentworth says
Lovely Crust! Finally I have found my go to recipe! Thanks!!!
Indi Hampton says
Thank you so much!!
Cj says
Hi Indi! Can I bulk ferment this dough in the fridge for around 12hrs? I've tried this recipe and it's the best! But just wondering if I could mix it, and have it rise for an hour then place them in the fridge for 12hrs to ferment and then take them out before shaping them then bake? Please let me know!
Indi Hampton says
Yes!! It's incredibly flexible! I would just pop it in the fridge after you do the first fold and let it go overnight, then shape into balls in the morning (or whenever) and let the balls rest about an hour before stretching into rounds and baking.
Paula says
This probably seems crazy but I just can’t seem to get the pizza off the peel and onto the hot stone. Help!!!!!
Indi Hampton says
Ahh shoot. You just have to be really generous with the flour and keep jiggling/ shaking the peel every so often as you load the pizza with toppings to make sure it isn't sticking, and if it does stick then add more flour underneath. There's nothing more frustrating than when you can't get it off! Just keep practicing and you'll get it!
Ian says
WOW! This is the best pizza dough I have ever tasted and I made it thanks to your recipe. Thank you so much for sharing, Indi. The only downside is that it is so addicting. All I want to eat is pizza now...not that that's a bad thing.
Indi Hampton says
Hahahah thank you!! I totally agree!
Sally says
Hello thank you for the recipe finally we ate a tasty pizza because of you.
All the love.
Indi Hampton says
Thank you so much!! So glad you enjoyed it!
Missy says
Dont use mixer/dough hook!! It SEEMS like alot of work ...but then its a piece of cake after you do it a few times! First time I tried mixing/kneading it with my kitchenaid and it was blah!!! Dont do it!! I'm not a pizza dough expert but I can make bread with my eyes closed! Follow the directions as written and WEIGH your ingredients and I promise you will get the best pizza dough ever!! Ive made it thick, thin and in between! I like it very thin foldable NY style ...spouse likes it pan pizza style! Also makes incredible breadsticks and pizza rolls! Ty for posting it! Tip! If you still have lumps after squeezing and pinching.....squeeze and pinch MORE until you don't otherwise you'll never get the lumps out
Indi Hampton says
Thank you so much! Love the tips!!
Azue Azizi says
I just made this few days ago and they turned out soooooo good! The pizzas looked like something out of a restaurant.
I used 00 flour to make them and will use bread flour when I make them again tomorrow!
Indi Hampton says
So great to hear! Isn't it amazing?!
Ashley says
This is the exact recipe I’ve been looking for. I recently purchased a Bakerstone Pizza Oven box and have been trying different doughs. Although this dough is more tedious than others, none of the others compare in taste. Crispy on the outside and chewy in the center, all while using simple ingredients and the taste is far superior. I will be making bulk batches when I have time to freeze so that pizza nights will be quick. Thank you very much for the recipe. Now onto to master a sauce….
Indi Hampton says
I'm so happy to hear this!! Freezing is a great way to batch it!
Ashley says
So after making this many times and loving it every time, I’ve encountered a bit of an issue. In the summer when it gets really hot out, my air conditioning keeps my house at a nice cold temp of 18° Celsius. The issue is, the time it takes for the dough to proof is alot longer. Could I proof this in my oven using the breadproof function and obtain the same results? Thank you!
Indi Hampton says
It's worth a shot! It likely will go a lot faster since oven proof temperatures are usually pretty warm, so just watch the dough more closely the first time to get a feel for how it progresses in there!
Tristan Dimling says
Give That Man Some Bacon
Bethanie says
I have done a lot of pizza a tried a lot of crust recipes. I had almost given up on making a pizzeria style crust without their ovens until I found this recipe. By far, the best crust recipe I’ve made and the family agrees. I put it in the fridge, after making individual balls because I’m all about the long game, overnight ferment. I also used my cast iron pans and cooked at 500 for about 9-10 mins in my top oven (a more narrow, single rack oven) and it was perfectly cooked through with a beautiful crunch to the exterior. Now to find a perfect sauce recipe to compliment this crust. Everything we’ve tried so far is just okay.
Indi Hampton says
So awesome to hear! Thank you for sharing! I'm curious-- what are you looking for in the perfect pizza sauce? Fresh? Cooked? Herbs? Simple? There are so many ways to go with them, I'd love your input!
Susan Sims says
I researched lots of pizza dough recipes and bookmarked a few before I attempted it. I'm just learning to bake properly. One of the recipes is yours and one an hour long recipe. Four pizzas ago I decided I was going to try yours...much more challenging but I'm retired and have the time. Well, this makes the most awesome pizza crust we have EVER had. Reading the entire post (instructions multiple times) and watching your fantastic video with the adorable, fun music (several times), I have got it down and the whole process is really fun. I just can't bring myself to watch the video without the music....it gives me the get up and go to get the job done! Thank you so much for creating this incredible recipe. In the past, I tried making dough but it was always sub par so I gave up. Never again!! No one should be afraid to try this recipe....once you've got it, you've got it!! I am in your debt. (Our next challenge is my hubby mastering the pizza launch from the peel to the stone...now that's a whole nother story)! 😅
Indi Hampton says
Haha isn't the music so good?! I couldn't help myself with it. So goofy and fun. I'm so glad you gave it a shot! I feel like the video really clarifies the whole process and distills all the words into something super doable. It's a pretty simple process once you dive in!
But yes... the launch is tricky. Just go heavy with the flour, keep jiggling the dough as you add your toppings (and don't add too many), and commit to the launch when you do it!
Susan Sims says
The music you picked is perfect!! I actually read the instructions before watching the video and just could not get it my mind. I should have been smart and watched your excellent video first. The phrase, a picture is worth a thousand words, could not be more true than in this situation. It took all the fear out of the process. I think I am going to watch the video right now just to get a 2 am jolt of adrenalin from the tune! Soooo much fun!! Thanks for your response above to me. Happy cooking!
Tiff says
Looks delicious! Wondering how this recipe would do with a shorter fermentation? Or any suggestions on how to make it work for a weeknight dinner or in a hurry? Thanks!
Indi Hampton says
You can't really speed it up and achieve the same results. BUT you can make the dough in the evening, let it rise slowly in the fridge overnight, then shape into balls in the morning and store the balls in the fridge for a few days. Or make it on a weekend and freeze the balls, then pull the dough balls out to thaw when you want a quick pizza night!
Michele Bayko says
I admit I don't truly understand the science behind this technique BUT... this is the BEST EVER PIZZA crust and it's worth...YES WORTH the time and the unique kneading process to create this dough! I like cooking it with the cast iron pan option as I really have a hard time with the pizza peel transfer and piping hot pan. DO NOT try and take shortcuts with the rising times - tried it and it wasn't nearly as good. Also make a double batch instead of trying to squeeze out 3 divisions of crust versus 2. It's still tasty but you lose alot of the chewy, bubbly-ness. THANK YOU for adapting this recipe from Ken Forkish. WE LOVE IT!
Indi Hampton says
Thank you so much!!
Susie says
I have made MANY pizza dough recipes and this is by far, the best pizza dough ever. It was amazing. Followed the recipe exactly and watched the video and it was worth the effort and time. I will never ever look for another dough recipe. Never!! Thank you very much for this wonderful find.
Indi Hampton says
Thank you Susie!! I'm so happy to hear this!!
Nicola says
Hi Indi, I used your recipe for the first time this summer in LA and was amazed; I’ve never had such amazing bubbles!! I almost died of delight, I was so happy!! I have been struggling to make dough in Denver for a couple years at high, dry altitude and was wondering if you have a high altitude version of this recipe. I just can’t replicate my results. (I tried using less yeast, less rising time, more water, etc and I just can’t get the same bubbles). I am also impressed by all your diligent responses!
Indi Hampton says
Hi Nicola! I'm so happy to hear you loved it!! Unfortunately, I have ZERO knowledge of high altitude baking. I'm so sorry!! I found an interesting article on King Arthur that may help you troubleshoot more. My initial thoughts are maybe try the rise overnight in the fridge instead of at room temperature? I'm super curious now-- keep me posted on what happens! https://www.kingarthurbaking.com/learn/resources/high-altitude-baking
Shana says
I made this dough yesterday and baked the pizza today. The crust was AMAZING! I was so proud. I will definitely make this again. I do have one question. I am a pizza novice so I may not have followed proper procedure but the dough under the sauce was a bit undercooked. Should the crust be par-baked prior to putting the toppings on it? We only used a jarred pizza sauce and a bit of cheese. The bottom of the pizza was perfect as was the edge on top. It's just that my dough under the sauce seemed a bit gooey, like it was not fully cooked. I'm afraid if I had left it in longer, though, the bottom would have burned. I used a pizza stone and heated to 500° for 45 minutes. Thank you for this recipe!
Indi Hampton says
Hi Shana! I honestly have no idea-- this has never happened to me. My initial thoughts are maybe it was too much sauce? Or the sauce was too watery? Or maybe it just needs a few more minutes in the oven? I'd try pushing the bake time a little bit longer to see if that helps. Or even straining out some liquid from the sauce. Let me know what you try and what happens!
Paul says
It's rising now. Can't wait to taste it. The recipe said 1 1/2 cups water plus 2 tblsp, then states to use all but 1 tblsp and use that for the active dry yeast. I thought maybe there was a typo so I just used the 1 tblsp water for the yeast and didn't think the dough would miss that extra tblsp of water. We'll see.
Indi Hampton says
I'm sure it'll be fine!
Kandie smith says
This recipe is easy and amazing 🤩 I use it all the time we no longer order pizzas! I first used this recipe as oven baked than did it stove top and both methods worked amazingly in this recipe! Thanks so much from a pizza loving Canadian ❤️
Indi Hampton says
Thank you so much!! I love the stovetop idea!
Brigett says
Hi again! Use this recipe for my Pizzaria and it is a hit.
What is the hydration for this dough?
Thanks again for this great recipe.
Indi Hampton says
That's so cool to hear! Thank you! This dough is 75% hydration.
Brigett says
Beautiful! Thanks for your response!
Molly Pisula says
This dough looks absolutely perfect. Can't wait to make delicious pizza at home on the regular!
Indi Hampton says
Thank you so much!!
Lou says
Simple but absolutely beautiful dough! Usually the best recipes are simplistic and use a technique or method this is one of those recipes. We made 3 doughs, the first two we only let rise an hour or so, but they were delicious. The last one we let rise for the recommended time and that one was bliss, light, bubbly and taste great. The dough out of the bowl felt very different than any other pizza dough recipe we have tried, we knew right away it was “right”, this is a keeper.
Indi Hampton says
Yes!! It really is simple and so special. I'm so glad you've been experimenting with it!
Iliya Petrov says
Hi Indi and greetings from Bulgaria!
I am still not tried the pizza dough but i definitely will these days- it looks very well! I just have 2 questions because in the last months I am trying different recipes for napoletan pizza (even at the moment I have a poolish in the fridge and today will try the recipe with it):
1) It's written that this quantity of dough (abt 880g) is for 2 12inch pizzas but they say that 1 neapolitan pizza dough ball should be 230-280g. I suppose it's not mistake when I am reading all of the thankfull comments but pls explain- is this for thicker pizzas (not neapolitan) and can I use the same recipe and quantity for 3-4 pizzas?
2) Can the long fermentation (2 days in fridge) be after forming the balls and if yes, do we have to wait the balls 2 hours to reach room temperature?
Thank you in advance!
Indi Hampton says
Hello! The dough does puff up quite a bit into a thick edge crust-- you can definitely turn it in into 3 balls, or even 4 smaller pizzas. It may be too delicate to really stretch super thin though.
And yes, you can bake the dough straight from the fridge! I actually prefer shaping it when it's cold. Good luck!
jules says
hello Indi
i love your recepie have been using it for 1 year everyone enjoy.
my question is what would happen if i use a bit of oil in the recepie.
thank you.
Indi Hampton says
Hello Jules! Thank you! I'm not sure what would happen-- give it a shot and report back! I'm curious though, what are you hoping to achieve by adding some?
Brigett says
Hello yet again lol
Can I double this recipe? Have you by chance doubled it?
Thank you!
Indi Hampton says
Yes! It works great! Just make sure to use a large container-- I typically let it ferment in a 6-quart tub.
David says
Everyone who makes pizza has heard of Vito Iacopelli, but seriously does it really take 3 days to make pizza dough ? No! The dough is pretty simple, flour, water, salt and yeast. The secret is how they are put together and fermented to get that perfect flavor. I’ve tried recipes on You Tube as well as the Net, some success, some failures, so now it’s your turn. Ok, yours is a keeper, the crust had that airy texture and was nice and brown on the bottom with some carbon glazed marks on the bottom. Only made a little modification to the fermentation, but otherwise followed your method exactly…. Thank you.
Indi Hampton says
You're so right! Thank you!!!
Abby says
Yikes, given all the glowing reviews, apparently I'm the only person in the world for whom this recipe was a fail! I followed the instructions exactly, spooned and leveled my flour, used 13 ounces of warm water (1.5 c + 2 T), and instant rise dry yeast that was brand new, brand name (I had to hunt through comments and find an instruction on how to use the yeast because the recipe doesn't say to put it in water but the video shows it being put in water. That's significant and the recipe should be updated to include that note). The dough was extremely wet so I ended up adding significantly more flour but even then, despite following all the other instructions exactly, it just didn't come out to be the nice, "dry" ball as shown in the video, it was a flat, sticky, spreading glob. There was absolutely no way to pick it up and spin it around when it came time to make the pizza and it kept springing back on itself and tearing holes. It tasted okay but did not meet my expectations for bubbly, light crust based on the photos and reviews. I may try again with less water and proofing my yeast instead of just sprinkling it in.
Indi Hampton says
Oh no! I’m so sorry to hear this! I literally just updated the recipe to use instant yeast, ironically, to try to simplify the process. Instant yeast doesn’t need to be proofed or dissolved in water, but I agree it may be easier just to stick with the traditional yeast proofing process!
This pizza dough IS very wet, very slack, very sticky. It’s counterintuitive, but instead of adding more flour, just wet your hands to manipulate it. This will make it easier to work the dough and prevent it from becoming too dense. The only time I do add more flour is when I shape it, so it doesn’t stick to the counter and it slides off the peel. Hope this helps! Would love for you to give it another shot!
Steve v says
Terrific recipe! Crust was exactly what we wanted, a little bit of work to make but very worth it. Had to use a lot of flour to keep it from sticking to the peel, which left a lot of raw tasting flour on the crust after baking. Any suggestions? Might try cornmeal next time. Has anyone tried a quick "pre-bake" for 1 minute with just the dough on the stone, then pull it out & add toppings, then finish baking? Wonder if that would still rise as nice. Thanks for sharing the recipe, it's delicious!
Indi Hampton says
Thank you!! Sometimes I notice that just jiggling the pizza frequently really helps, so it doesn't sit too long and start to stick. I haven't tried cornmeal-- let me know if you do! Same with the pre-bake. Sounds like a fun idea!
Anthony Chisholm says
Just making this today for the first time.Love making pizzas with the normal dough recipe but I am really looking forward to trying this one.Will let you know how it turns out.Do I need to put corn meal on the stone or would it just burn?Thank you,
Anthony
Indi Hampton says
Hi Anthony! Yeah, cornmeal will burn. Just make sure to constantly jiggle the pizza on the paddle as your assembling the toppings, and if it's sticking then add a little more flour in those spots. Then slide it onto the stone (aim for the back edge!) and you should be good! I can't wait to hear about it!
Anthony Chisholm says
Thank you for the advise.
Crystal says
Ok, wow………………Turned out amazing on my first attempt! This crust is worth the extra steps!!!
Indi Hampton says
Thank you so much!!!
Jacki says
I can’t wait to try this pizza dough. I’m planning on making the dough tomorrow and the pizzas the following day. When I put the dough in the fridge in says to place it on a plate. Can I store it in a bowl instead? Sorry if this is a silly question:)
Indi Hampton says
Of course! Sorry I just saw this! Just make sure to grease the bowl well.
Adriana says
The best pizza dough recipe I have ever tried.
Indi Hampton says
Thank you!!!
Courtney Kmetz says
6yo approved!!!!
I made this piece of recipe for my family last month and my six-year-old gave it two thumbs up.
Now that I have a pizza stone I'm going to double the recipe so I can make a garlic cheese bread to go with the pizzas.
Indi Hampton says
I love this!! The pizza stone will make it soo good!
Kim says
This recipe is the one I have been searching for years! I did use bread flour (hi-gluten) and proofed the yeast in the warm water with a Tbsp of sugar for about 15 min before adding to the flour and let it rise for an hour before storing in the fridge for 2 days. So delicious!! I over shot how much dough I made so I took some and let double again and made a loaf of bread and it was so good!! Definitely a keeper! Thank you for this recipe. Try it, you will not be disappointed.
Indi Hampton says
Thank you for sharing!! What a fun fridge hack!
Georgie says
Incredible, taste and texture is identical to our favourite wood fired oven pizza restaurant, we make ours in our fire oven and find it freezes really well with minimal loss of quality. Love watching the dough rise throughout the day
Indi Hampton says
Thank you Georgie! Ohh man I'm so jealous of the wood pizza oven! We used to have one growing up and it was so amazing and fun.
Nora says
This was by far the best homemade pizza we’ve ever had and everyone was blown away by the dough. I must admit it wasn’t that easy making it as it really takes time and I’m not the most patient person, but we’ll worth the wait and even though it’s very hot where we live ie the yeast wouldn’t stop and the dough was making bubbles and wouldn’t let me shape it into a nice ball, it was still really easy to form and bake. Thank you so much for sharing this Info and adding the video too. Super helpful! ❤️
Indi Hampton says
Amazing!! Thank you so much!
Iliya Petrov says
Hey again Indi!
Finally I tried the recipe and it was really tasty!
I've baked it at 485 Celsius (abt 900 F) for 90 seconds and it was really really good (compared with common non-autolysis method for standard Napoletana). Thank you for sharing!
Indi Hampton says
Thank you!! I love this!
Mike C says
It is not clear to me in step 5 if ALL doughs balls are rested for an hour or only if you intend to bake it right after that hour, thanks.
Indi Hampton says
Great question! They only need to rest at room temp if you plan to bake them right away, otherwise just put them straight in the fridge.
Jennifer says
This recipe is an answer to all of my homemade pizza prayers - thank you!
I made the dough today and cooked one pizza tonight, while I have another dough ball in the fridge to cook later in the week. When I stretched the dough out to create the crust, I found that it kept springing back and shrinking the overall size of the pizza. I couldn't keep a crust on the edge and with all the jiggling on the peel, (thanks for the tip, brilliant solve to one of my biggest pain points!) the dough kept settling out in to an even layer. I ended up with a smaller, thicker base and crust, which is delicious but not exactly what I want. Any advice on how to keep the dough from springing back when forming the crust? Thanks!
Indi Hampton says
Hey Jennifer! Thank you so much! When dough springs back like that, just set it aside for 5- 10 minutes to let the gluten relax. I would make sure it's on a well-floured surface so it doesn't stick, and cover it with a clean dish towel so it doesn't dry out too much. When you come back to it, the dough should be a lot easier to work with!
Sandra says
I've been experimenting with pizza doughs for the past month and half and this is hands-down the best recepie! Comes out amazing! Worth the time for sure.
Indi Hampton says
Thank you so much!!! Once you get the hang of the technique/ timing, it doesn't even feel that time consuming!
Shelbi Y says
Going to give this 5 stars already because it smells delicious! I have it resting right now for the hour mark and then will knead again and rest for 5-6 hours, however, I am nervous that I oiled the bowl too early! I oiled the bowl before letting it sit for an hour, not hte 5-6 hour mark. Anyways, I have high hopes this is going to be so tasty!
Indi Hampton says
Yayy thank you!! Just wait for when it's hot out of the oven!
Stacy says
I made this tonight and not the nly is it the best pizza dough that I have ever made, but it's the best I have ever eaten. Thank you for this recipe. I am very picky when it comes to dough and this recipe is outstanding. Thank you so much for posting.
Indi Hampton says
Ahhh thank you so much!!
Karen says
I just made this crust and I just had to leave a comment(rarely do). I have been on a pizza crust quest for about a year looking for the best crust, many, many, many recipes later I have found the one!! This recipe!! THE.BEST.CRUST. It is perfection, perfectly tender, perfectly crispy, perfectly bubbly. Although it is a bit more involved than most, and unique in the making than most, it is worth every bit of the time. People look no further this is the recipe you have been searching for!!
Indi Hampton says
Thank you SO much Karen!!! I love this!
Heather says
I've got as far as adding the yeast and salt and doing the first kneading... I have a very dry dough!!! I used exactly the right amounts of flour and water, used bread flour... what's going on??? It's meant to be wet and loose, this is very stiff and dry!
Indi Hampton says
Hi Heather-- I'm sorry to hear this! I would try again with all-purpose flour and use a scale to make sure you're exact then let me know! It's possible it could be as simple as using bread flour vs all-purpose.
Heather says
Thanks so much for replying! I weighed it out to the last gram! I ended up adding quite a bit more water and I think the dough was wetter than it should have been... it was very sticky... but the end result was heavenly! I also halved the main rising time by putting the container of dough to rise in a sink full of warm water and adding hot water occasionally to keep it blood temperature. Making it again today and trying the sauce recipe also. Using 00 flour this time.
Vicki says
Hello, Could I use my sour dough starter in this? If so what amount would you use. Thank you!!!!
Indi Hampton says
Hi Vicki! I'm sure you could, but I'm just not savvy enough with sourdough starters to recommend how much to add. I wish I could help more, but I would recommend checking out Ken Forkish's work. I'm sure he has sourdough solutions!
Erica Bending says
Perfect pizza crust. first One I made on my pizza stone and it was so perfect, looked like a magazine picture and tasted great!
For the second pizza, for various reasons that were my fault, the crust stuck to the pizza peel before I transferred to the pizza stone, so I folded it Into a calzone and baked on a cookie sheet, and wow was that also delicious!!!
This is my new forever pizza crust recipe!!!!
Indi Hampton says
That's so amazing and exciting!! I LOVE the calzone solution!
Brigett says
Hello again.
I would like to know when I can freeze the dough balls? What do you recommend?
After the one hour rise and fold or after the 5-6 hour rest?
Thank you
Indi Hampton says
After you've shaped them into balls (through step 4)-- there's a section in the post all about it!
Brigett says
Thank you again!
Cat says
Are there any recommendations for cooking this on a propane grill? I'm planning on putting a pizza stone on the grill and cooking that way. Also should I flour the stone before transferring it? Thank you in advance I'm excited to see how it comes out!
Indi Hampton says
Hi! I've only grilled pizza once, so I don't have a ton of usable advice, but here's what I can say! Preheat the stone for as long as you can on high heat-- this will minimize hot spots. I was afraid of running out of propane and didn't preheat it very long, so the crust was sort of unevenly cooked. Tasted good, but more on the crunchy vs crispy/ chewy side. And don't flour the stone! It'll just burn. I wish I had better tips-- maybe I should test this more? Report back!!
Morgan says
Hi Indi! So excited to try this new recipe! I started making it and it is no where near as sticky as yours, in fact it’s pretty dry. When I did the grams to cups conversion on google it should be around 2.25C of flour not almost 4C. Do you think maybe that’s my issue? Not enough water or to much flour? Can’t wait to try!
Indi Hampton says
Hi Morgan! I'm not sure where the issue is here! When I google 500g flour to cups it says 4 cups, other reference books say 1 cup all-purpose flour = 125g (or 500 g/125g = 4 cups). The variation comes down to how you scoop it, how aerated the flour is, etc. For me personally, the way I scoop and level flour it comes out as ~3 3/4 cups plus 2 tablespoons. You could try spooning the flour into the measuring cup then using a knife to scrape it evenly-- that should honestly be close enough. But if you're still not sure, I'd recommend a scale. They're cheap and easy to use! https://www.amazon.com/Escali-Digital-Multi-Functional-Kitchen-Measuring/dp/B0007GAWRS
Eric M says
Wow! I have tried so many dough recipes trying to find one that consistently came out bubbly and chewy. This is THE ONE! I still have a little trouble flouring the surface of the peel right - too little flour and you have to shake it so hard the crust stays and the ingredients go flying, or too much and you get that dry floury bottom. But will definitely work that out because the final product is fantastic! The best things about it are that I have used it the same day and used it three days later with the exact same outcome. And it takes so little yeast that it just doesn't have that overly yeasty taste to it. It was great on a pizza steel in the oven. Can't wait to do it properly on my cordierite stone on the grill.
Indi Hampton says
I love to hear this! Getting it off the peel is FOR SURE an art. Just keep practicing 😉
Linda says
Wow, I made this dough.. I thought it was a was a lot of steps making it.. but the first time usually is. I divided it into 4 balls, froze three and made a personal pizza. This dough is amazing. Tasty, light, bubbles! I loved this dough. it is better than must pizza shops I have visited. Thank you!
Indi Hampton says
Thank you so much!!! I'm so glad you love it!
Chantal says
Hi:-)
I sm making this pizza dough now so it’s probably too late for you to answer me in time but I will guesstimate it for this time and ask for the next time. I would like to know if making this pizza in a pizza sheet pan if I have to increase the cooking time?
Can’t wait to taste it.
Sean Stanley says
Hello there!
I'm making the recipe but I'm going to freeze one of the dough balls.
In your freezer instructions for thawing, you say to place it on a baking sheet and cover it before putting it in the fridge. Can it be covered with a dish towel or plastic wrap?
Looking forward to trying this recipe tonight! 🙂
Uriel says
Tried three different recipes, and this is undoubtedly the one! Perfectly crusty, perfectly fluffy, I'm in love. Though I'll have to use less dough for the same pan size to decrease the thickness, especially round the edges. It's a matter of preference.
Indi Hampton says
Thank you!!
Barbara Crosbie says
Hi there wonder if you can help me. I made your pizza dough and used 00 flour and baked in the oven at. 450 for 10 min. Having said this it wasn’t the airy crust like your picture can you help me ? Not sure what I did wrong. We love these pizzas with the airy crusts.
Thanks Barbara
Indi Hampton says
Hi Barbara! I'm sorry to hear this. Was the dough bubbly? Do you remember how long you let it ferment for? It's possible the dough just needed more time!
Ezz says
Wow, wow, WOW. I made this dough yesterday, and it was INCREDIBLE! The flavor and texture are out of this world, and SO worth the planning ahead. I tripled the recipe for a pizza party, and it worked perfectly. The directions are very straightforward, too. Thank you!!
Indi Hampton says
Ahh thank you for sharing!!!
Amber says
Omg this is phenomenal! Finally I can end my never ending journey of trying and being disappointed in pizza dough recipes. I followed the recipe to a tee and it came out amazing. Looked like restaurant quality, beautiful crispy, soft, blistered crust and really good flavour. Thanks for sharing this! It’s got me excited for more pizza nights
Indi Hampton says
Thanks so much!!
Barb says
Indi, I make this all the time! Have started playing around with sourdough, any recommendations for a recipe using sourdough that turns out this wonderful?
Indi Hampton says
Hey Barb! I wish I did! You're not the first person to ask for a sourdough version and it would make so much sense to have a recipe for that. I haven't played with sourdough in a few years, but I would love to get back into it! When I do, pizza dough will be my first stop 🙂
Chantal says
Hi Indi
I made this pizza so many times already and it’s so amazing. I wanted to ask you if it was ok to leave it rest overnight instead of 5-6 hours before making it Into balls? Then I would make the balls in the morning and let it rest again for the last hour? I made a mistake and thought it was during the 5-6 hours that we could leave it in the fridge longer and I do t want to mess it. Hopefully you answer me quick if not I will wake up in the middle of the night to continue to step 4.
Indi Hampton says
Ahh!! I'm sorry I didn't get to you sooner!! Yes, you can TOTALLY put it in the fridge for the ferment. I would just make sure to coat it lightly with olive oil and cover with plastic wrap to prevent a dry skin from forming on the surface.
Michelle says
Soooo excited to try this! I’m in the process of making this for dinner tonight. I didn’t start early enough (it’s nearly 2p here) and I’m wondering if I can use the proofing function on my oven rather than the 5-6 hours. 🤪🤪🤪
Indi Hampton says
Hi Michelle! Sorry for the late reply. Next time you can totally try the proof function in your oven, but the results will just be different. This dough does best with the slow fermentation to develop the complex flavor and bubbly, chewy texture.
Olivia says
Could ap einkorn flour be used?
Indi Hampton says
I don't see why not! I'd love to hear how it goes 🙂
Haley says
I will be trying the cast iron method, do I need to pre-heat my enameled cast iron pans in the oven like the stone gets preheated? I am so excited to eat this pizza!
Indi Hampton says
Yes!!
Creative publish says
Thanks for sharing
Brett B. says
This dough recipe was a revelation for my wife and I, who have spent literally years trying every 5-star pizza recipe or cookbook, only to be really disappointed in the results. This one’s breakthrough, it turns out, was its emphasis on using the least amount of kneading possible. Before this we were working the heck out of our doughs, thinking we were developing the gluten structure, but not realizing we were actually breaking it. Minimal kneading made all the difference in the world, and our resulting pies are now as good as any pizzeria we’ve dined at. Can’t thank you enough for restoring our confidence and enjoyment of at-home pizza, Indi. We salute you!!!!
Carmen says
Fabulous crust, exactly as described: chewy, crispy with gorgeous air pockets. Hard to believe it doesn’t need two days to get these textures! I get amazing results in my outdoor pizza oven at the cottage and great results in my oven at home at well. This has been my go-to recipe since I found it about a year ago. I make it exactly as described.
M.B says
Let the pizza dough sit in the fridge for the full 2 days- best pizza dough recipe I've made! Excellent structure and flavour, dough is really easy to work with. This will be my new go-to recipe. Thank you!
Erin says
Thank you so much for the amazing instructions and video to go along with it. I am soooo excited to make this and serve for dinner tonight. There is something so special about our modern day lives, where, even if you didn’t grow up in a home where you were taught life skills, you can go out and find them being taught elsewhere. Thank you for taking the time to teach us this awesome life skill.
Indi Hampton says
Ahh you're so welcome!!
Sarah says
I accidentally forgot the fold after the first hour and did it at hour 4 and am going to 6 hours….is my dough doomed? 😩
Indi Hampton says
Sorry for the delay! I would say it's probably fine, but I'd love to hear what happened!
Jenn Hamblen says
The very best crust for my homemade pizzas. So simple yet so delicious! Thank you so much!
Indi Hampton says
Thank you!!!
Bethy says
First time today and turned out really great, even though I just used a regular pan - nothing preheated
I have 2 questions:
1.) in the blog it says: This pizza dough ferments for about 6 hours at room temperature. For maximum flavor, you can let it slowly ferment in the fridge for up to 2 days…. Is the 2 days in addition to the 6 hours at room temp or instead of?
2.) Instead of 2 small pizzas could I make 1 big pizza with this recipe?
Indi Hampton says
Hi Bethy! So happy to hear this!
1) You can let the dough continue to ferment in the fridge for 2 days after you've shaped it into a ball. Grease the balls and the plate and cover with plastic wrap.
2) You can absolutely make 1 giant pizza with this dough. I would probably spread it all out on a sheet pan.
Good luck and Merry Christmas!
Mk says
The crust was great! I cut out the work though and used my stand mixer instead! It still turned out great! My cheese burned when I put back in for broil, but next time I won’t put under broiler. I think it was done after the 500!
Patricia says
When defrosting in the fridge, are the dough balls still tightly wrapped in plastic or should they be loosely covered? I'm so excited to finish this recipe! I froze the dough balls Sunday night and plan to put them in the fridge Thursday night for our weekly Friday night pizza date. It's definitely a different consistency than I'm used to at the start but by the end the dough just felt so right. You know, that feeling when you just know that it's going to taste so good...
Indi Hampton says
Tightly covered is great! Just make sure the balls are greased with olive oil so the dough doesn't stick. Merry Christmas and enjoy!!
Kitty Ann says
Tried your recipe last night - all I can say is PERFETTO! SO GOOD!! The texture of the dough was luscious! I posted some pizza porn of the dough, and the resulting pie, on my FB account, along with the link back. Thanks for the recipe!
Ellie says
I NEVER post comments but this dough is anazing for such little effort! Chewy and tasty!
Bethy says
I’ve made this a couple times. It’s great!
Would it be okay to bulk ferment the entire batch in the fridge for a couple days instead of waiting 6 hours to make the portioned balls and refrigerating the balls? (It’s be easier to have one ball in the fridge rather than two)
If I want to make more, at what point do I freeze it?
Bethy says
I went ahead and read the blog and saw I can freeze it after I shape it into balls. I’m still curious about bulk fermentation in the fridge
Bethy says
I found this in the blog:
This pizza dough ferments for about 6 hours at room temperature. For maximum flavor, you can let it slowly ferment in the fridge for up to 2 days.
So I can put it in the fridge for 2 days instead of on the counter for 6 hours?
Brittany says
Wow!!! This recipe is a major hit! We have made soooooo many pizzas and as soon as this dough was ready I knew it would be a game changer. Thank you! My kids love it!
Susan Neul says
I tried so many crust recipes until I found this one. It’s exactly what I was looking for. Crispy and chewy! I made it last summer on a pizza stone on the grill and will be making it in the oven for friends this weekend so I’ve been practicing. I had some issues with the cheese getting too brown before the crust was done. All ovens are different. I tried putting the crust in alone for 3 minutes and then adding toppings. That worked well. i suspect what I really need to do is play around with the temperature. I also learned to use full fat mozzarella. This makes a HUGE difference. Anyway, we love the recipe. We’ve been eating pizza the last two days as I practice
Faye says
I'm still learning with bread doughs, and I was unsure of myself during the entire process of this recipe. I've never worked with a dough with such high hydration and I was a little clumsy with it. I'll be getting more practice to get better because the pizza turned out fantastic. I'm so, so happy to be able to make such a light, chewy, crispy dough at home.
Claire says
I'm in the middle of making this and quite disappointed. It is very gluggy. I followed the recipe exactly - I used the weights advised and there is too much water. It doesn't hold its shape at all and I couldn't fold it even after I added a bit more flour. Its currently fermenting for 6 hours but I'm considering tossing it in the compost. Even wetting my hand it sticks like glue. I keep wondering why others have had such success but mine is a complete flop. It looks achievable from the video but its not gluggy like mine.
Anonymous says
Anonymous says
Anonymous says
Anonymous says
Anonymous says
Anonymous says
Anonymous says
Anonymous says
Dory says
I never comment on recipes, but this one was seriously too good not to. I have tested so many pizza doughs and I finally found THE one! This was chewy, crispy, and all the best of textures! My family loves this recipe and we have made it several times and it’s been sooooo good each time! Than you!
Megan says
I'm not gonna lie... the process of making this dough felt weird. I was not at all confident. BUT I stuck with it, and ended up with the BEST crust. 100% restaurant quality crust. I doubled the recipe, and made 4 pizzas.... pepperoni/black olive, cowboy-esque, chicken/bacon/ranch, and a herbed ricotta and arugula. I will be making pizza regularly now that I've found this recipe. THANK YOU!
Mindy Broom says
OMG I have finally found the most perfect pizza crust. Others I've tried have been missing something...just blah...and didn't care to eat the crust. This is the best. Made it Philly cheesesteak style and it did not disappoint. I had to have another slice for breakfast, though thru in a fried egg to give it that hangover vibe. lol. Definitely doing this again. If I had wiggle room in my freezer, I'd go ahead and make a few more and stick in there for future use.
Becky Ann says
Could you make this with instant yeast?
Indi Hampton says
Yes!
Lisa says
I made pizza with your recipe today. I started it yesterday and refrigerated after shaping the balls. I made enough for three pizzas. I used instant yeast instead of active dry yeast. I mixed the dough in an Ankarsrum mixer then moved to an oiled bowl for the folding and resting. The dough was easy to shape right out of the refrigerator. I baked it on a baking steel in a lower rack in my oven at 550 degrees. I missed the part about broiling but it came out great after about 9 minutes. Very good crust. The texture was tender yet chewy. Nice and crispy on the outside. It rose pretty evenly around the edge while in the oven without big annoying bubbles I get with some doughs.
Sandra McGregor says
This is by far the best pizza dough recipe I've tried! Is there any way to convert the recipe to use sourdough starter instead?
Indi Hampton says
Hi Sandra! I don't have any tips on this for a sourdough starter yet, I'm so sorry!
Shirley Yeo says
Sooo excited to find this recipe. We just got back from Italy where we took the AVPN pizza class in Naples. VERY disappointed with the heavy dough. Was hoping for a thin bottom with a bit of a crisp and an airy cornicone with chew that is flavorful!! Can't wait to try yours but I have a few questions...
1. Which Baking steel do you recommend as they have several? Do other baking steel brands work as well as they are less expensive or do you find the one you recommended the best?
2. Have you ever tried cooking it on the BBQ?
Indi Hampton says
Hi Shirley! Ahh I'm so excited for you to try it, too!
1. For the baking steels, I have a feeling they're all the same. I've only ever tried the Baking Steel brand, but I doubt there's much difference!
2. I HAVE tried this on the grill (on a baking steel), and it didn't go well. I need to do more tests but basically it got too hard and dry on the bottom without cooking the top enough. I'm sure it has to do with how hot I got the grill in the first place, and using indirect heat for the actual cooking. I'd love to hear if you try it and what you learn!!
Lisa says
I have made this recipe twice now. The second time I left it in the fridge for two days before shaping and baking. I think the longer time gave it more flavor and a better texture. The first batch was very good but the second was fantastic!
Indi Hampton says
So happy to hear it! Thanks for sharing!!
Jessica says
I’ve been using this recipe for years and I love it. My family thinks this is the best pizza ever. I have been making it on our Traeger and it is so amazing!!
Indi Hampton says
Ohhh that sounds amazing! Do you have any Traeger tips you can share!?
Evan White says
Not one to make comments but I had too.
This recipe is fantastic, yes there is a long prep timeline, but there is actually very little work to get a great result.
Fridays is now pizza night and all the family love the new bases.
Thank you....
Indi Hampton says
You're so welcome!! Thanks for sharing!
Kathryn says
I have been trying different pizza crust recipes for YEARS!! I don’t comment on recipes, or anything else for that matter… but I have made this recipe three times now and I absolutely love it! It is what a good artisan pizza dough should be… the only thing I hate is how many hours it takes!
Indi Hampton says
Yayyy thanks for sharing!! It does take a lot of time. Luckily it's pretty low-maintennce, though! Try making a giant batch and freezing the balls (I share tips in the post).
Sherrie says
If I want to bring pizza to a friend can I make them at home and reheat when I get there?
Indi Hampton says
For sure!
Lee says
This made the best pizza, honestly!! I never worked with yeast or dough (in general) but everything was so simple to follow! The video also helped a ton. Made five personal pan pizzas with the dough! My family couldnt stop complimenting the dough: it was fluffy and soft on the inside but had a nice crunch on the outside. Absolute keeper!
Indi Hampton says
Thank you Lee!!
Gen S says
I never comment on recipes and I almost never read the whole article or watch the videos - I am the original fan of the "jump to recipe" button. HOWEVER, this pizza dough is AMAZING and the article and video were very helpful. I made a half recipe last night and we had one perfect pizza topped with my own sauce, mozzarella, italian sausage and banana peppers. It was spectacular. Crispy, nice crackle when you cut it, but still light in side. You can pick up a piece and no flop. I cooked it on a parchment paper lined metal pan on a preheated stone on the gas grill at about 500/525 for 13 minutes. I've thrown away all other dough recipes! It's my new Sunday night obsession and I will be trying new toppings with this great recipe!
Indi Hampton says
Ahh thank you for sharing!! I love to hear this!
Caroline Swaim says
I began mixing dough this morning, 8/13/24. All went well until final step. Dough doubled, divided dough and after 3-4 stretches an d folding over, the dough became extremely sticky. I could not form into ball, so I wrapped it in plastic wrap with EVOO, placed in refrigerator. Plan to use in 2 days.
This is my first attempt to make pizza dough. Can this dough be saved, your advice would be appreciated.
Andre says
My wife and I can't get enough of this recipe. We love it! My only question for you is that despite using these exact measurements, but with '00 flour, my dough is significantly more wet than yours. I'm sorry if you've already answered this, but how many additional grams should I add? I'm using Molino Grassi 00 organic soft wheat flour. I pretty much just add flour until my dough's consistency is similar to what I see in the video you have alongside this recipe. Not sure if I'm overdoing it though as I'm not a very experienced dough maker. Thanks for your help!
Barbara S says
Can I use bread flour… it’s all I have
Indi Hampton says
Sure! Give it a try!
Tonya Falk says
I have made it today and it tasted great. I was a bit sceptical there is no sugar but it turned out really good. I baked it in Bosch oven with convection and my pizza crust didn't brown to my liking. But nevertheless it tasted really good. I will definitely make it again.
Darlene Frisicaro says
This is a great tasting recipe. I tried to ferment it more by leaving it one night in the refrigerator. Your directions say to shape it into a round pizza right from the refrigerator. The problem I had is it would not stretch out. It was very thick. Is there a way to get around that? I tried to stretch it as you mentioned but it was very hard. Would it be better to bring to room temperature or put in microwave with light on to warm it up first?
Ash says
The best crust recipe I’ve ever made…and maybe ever eaten. Crisp, bubbly, with just enough chew and a delicious light tang. The dough felt so beautiful in my hands, I knew it was going to be amazing. Trust the process: the dough does feel wet in the beginning, but it develops into a gorgeous, velvety texture. Slow proofing gives such a wonderful depth of flavor, and lovely irregular bubbles.
MJMacarty says
Is it really only 1/4 tsp. yeast?
Indi Hampton says
Yes!
Wilbur Griffin says
Just made this recipe with my Ooni wood fired oven. the dough was very good. Would love to see you. Would love to see if you could see if it is the best it could be with Neapolitan style pizza with high cooking heat.
Could not believe the yeast measurement but you were right,
Thanks
Wilbur
Ashley says
Been using this recipe for a year or two now and it's always so good. It's so good, my family would usually eat this than get take out pizza! Plus, now my child insists that I make the BEST pizza in the WORLD. So thank you. 🙂
Indi Hampton says
Hahah YES! If it's something our kids will eat I call that a HUGE WIN! So happy to hear this!
Tina says
I would like to use sourdough starter instead of yeast. Do you have any idea the amount that would be needed?
Dani T says
This is by far the best pizza dough recipe I’ve tried and my favourite thing about it is the simple ingredient list. Good pizza dough can be hard to come by but this one does not fall short. l’ll admit, the instructions sounded a tad daunting but turned out to be easier in action. This recipe is going to be my go-to from now on. If you’re looking for a chewy, bubbly, and crispy dough, this recipe is the one. Thank you for sharing this gem 😉
BSmith says
Hello again, still using this recipe. Love it.
2 questions:
What is your room temp when making this dough and when can I freeze them in this process?
Thank you
B
Sarah says
When she says you can put it in the fridge if you're not making it right away, that is a good freeze point. According to another thread on here, they formed the pizza crust, and froze it so later they could add the sauce/toppings, freeze again, and then treat the whole thing like a frozen pizza!
I ignored the "room temp" and at the 5-6 hour rising stretch, instead I put mine in a slightly warmed oven - I turn my oven on as if to heat it up, but I kill it before it does anything but warm the air. Anything above 120/130f will kill your yeast. Doing this, it only took 2-2.5 hours, instead. Hope this helps.
Janice says
This is the pizza dough recipe I've been searching for! It came together easily--none of the steps took long--and tasted amazing! I just need to practice getting it from the pizza peel to the stone. I think I'm going to try a few smaller pizzas next time until I get the hang of it. Thanks for the video. It was really helpful!
Robin says
Delicious crust recipe! I’ve made it twice so far and the second time came out even better. I cut the salt down to 1 tsp due to dietary restrictions and made three pizzas from this recipe. The crust was airy, chewy and delicious! FYI - I made it late in the day for company coming the next day. When it came time for the 5-6 hour rise, I let it rise for two hours on the countertop then got sleepy and put it covered in the fridge overnight. I woke up early and let it rise for 4 more hours and then put it into three balls and let them rest for one hour. Just in case anyone was wondering, it did not ruin the recipe to do this but instead made it taste even better than the first time I made it. Thank you for this recipe!
Isabel Beckford says
This recipe was amazing. So airy and beautiful! I was wondering though do i need to let the refrigerated dough rise before stretching and baking?
CWhite says
AWESOME! Crispy, chewy crust. Finally a crust worthy of the White House (LOL.My last name is White)!!!!!!!!!!!!!! I baked the pizza on a pizza steel. My oven goes as high as 550F so I only needed to broil it ~ 1 1/2 - 2 minutes. Thank you for the awesome recipe.
Babsaroo says
Sadly 10 stars is not an option! This is THE BEST pizza dough recipe!!!! I've tried A LOT of pizza dough recipes on Pinterest and i have pinned a bunch. This recipe is by far the best. Therefore, I will be deleting all the other pizza dough recipes on my board. Thanks for the recipe and thanks for cleaning up my Pinterest board! LOL
Anna says
Hi! Can instant yeast be used? If so, would that step in the process change? Thank you!
Doug Clark says
I’ve been banging my head against the wall trying to get good, consistent results with pizza dough, mostly trusting the recipes in the book American Pie, but I decided to give the internet a shot after failing to get the “chewy” pizza dough I was after.
This recipe was amazing! I worried about the tiny amount of yeast, and almost no kneading, but the results were everything I’ve been hoping for!
Thank you so much for the recipe! It’s gotten back on the pizza making wagon!
Kameryn says
Snowed in so what better way to pass the time than by making homemade pizza! Stumbled upon this recipe on Pinterest and I think I can say it’s the best pizza dough I’ve ever made! And I’ve tried quite a few. I was so nervous of how it would turn out, and it was lovely! Chewy, crispy, bubbly and took on nice color with the best little charred spots. Made one traditional pepperoni and the other with homemade alfredo sauce, chicken, spinach and tomatoes. Both turned out great!
Thank you for sharing such a great recipe! This one is definitely a keeper!!
Indi Hampton says
Yayy thank you so much! Gosh that alfredo one sounds so good!
Tennille says
OMG!!!!! This pizza dough recipe is absolutely amazing and worth the time. I just got into bread making a few weeks ago and I have always been intimidated by pizza dough. I decided to give this a try and I'm so glad I did. I used the inverted pan method and it worked out fine but I plan on purchasing a pizza stone to enhance the experience. Thank you for sharing this wonderful recipe. The video also help tremendously!!!
Lorraine Crouse says
This recipe is simply PERFECT!
Thank you!
Kathleen says
I haven't made this yet excited to try as it does look east but I am curious is there a way to flavor it such as with garlic, some herbs or such. I love good pizza dough no matter what!
Indi Hampton says
You can always try some dried herbs or maybe garlic powder, but I would be concerned that they'll burn at the high temp. I think adding grated garlic or fresh chopped herbs to the pizza at the end would bring more flavor to the whole thing. Report back-- I'd love to know what you try!
Hiroko says
I have a question. Can I make 1 16 inch pizza out of your recipe?
My dough has rested 6 hours, and I don't know what to do at this point.
I will use it tomorrow's dinner).
Indi Hampton says
The recipe works for 2 12-inch pizzas. I would recommend still cutting the dough in half, shaping it into 2 balls, and chilling until tomorrow. Then you could make 1 ball of dough as wide and thin as possible (probably 14-inch) and freeze the other dough ball. Or, you could just make 1 massive pizza from the whole batch, but it's about 10% extra dough for a 16-inch. I'd love to know what you do! Report back!
Hiroko says
I cut the dough 2 as you suggested. When I put 2 doughs back to together, although I tried to fix it, it has become oval shape (lol) oh well... yet it still came out nicely (and DELICIOUS!). Everyone loved the dough. I probably will make 2x 12inch pizzas next time. Thank you so much for the best pizza dough recipe!!!
Alaysia says
First time making pizza and it definitely wont be my last. This recipe was chewy flavorful and a 10/10. It was 8 hours of work though haha.
Thurman says
OMG!!! I am SO VERY happy to have found this recipe. I am currently living in Jerusalem, and there is no shortage of pizzerias near me. However, all of them are kosher which means NO mixing of meat and cheese. I tried making my own pizza for the first time several months ago using a different recipe, and the result was COMPLETELY inedible. Given that result, I was naturally quite skeptical about trying my hand at pizza baking, again, but I am SO GLAD I came across this recipe and gave it a shot…AMAZING!!! First, I could not believe just how SIMPLE this recipe is: Flour, Water, some salt, and a bit of yeast…REALLY?!?! The hardest part was waiting between the various steps. My dough was EXTREMELY wet and difficult to handle, but the result made the effort TOTALLY worth it! I ABSOLUTELY LOVE this pizza and will be making it regularly. Thanks so much for sharing!!!
Emma says
Hi Indi,
I am currently testing pizza dough for our new table top pizza oven (Ooni). I tried this recipe and the flavour and texture was delicious, the best so far! It was surprisingly easy to stretch and move despite being such a wet dough. I just have a couple of questions.
My dough was wetter than yours in the video. I added a couple of tbs of flour after the first rise and folded it in and that seemed to work. We made it with 00 high protein flour rather than all purpose. Do you think that could be why it was wetter?
Secondly, it rose a bit too much for our liking - the centre was like a foccaccia. We are using 16inch peels. Would you suggest I try making 3 balls instead, or reduce the yeast, or reduce the rise time?
Many thanks, Emma
Quinn Johnson says
The best homemade pizza. I used the 00 flour and made the homemade sauce. This is my favorite recipe and my go-to.
Steve says
Great texture. Next time I’ll cut into 4 balls to make 4 smaller pizzas. Everything turned out well but I could not get the round disc shape using gravity! I ended up rolling them out. I also briefly cooked the bases first, just until they started to bubble.
Christina says
This is fantastic, thank you! Technique is similar to a high hydration sourdough. Added to my permanent recipe box 😊
Shayne says
Hello I was wondering if I could use OO flour instead of all purpose flour? I have made this recipe several times and I really enjoy it. I’m just starting to experiment with different types of flour for my dough.
Crystal says
This is my go to flour and it works beautifully for this crust recipe.
Ingo Wittig says
Thank you Indi, you really nailed it. I have Ken Forkish's book (his pizza kitchen was sort of in my 'hood), and you really helped me understand everything I'm doing with the dough and all of it makes more sense to me now.
I've been on a quest of two years to make my Ooni work for me. I have a Koda 16 that I converted to natural gas. Ditched the stone and got a custom made carbon steel on Ebay. Each was a step closer to my goal.
So glad I found your site. Nirvana at last! You rock!
Indi Hampton says
Gosh, thank you so much for your comment! I'm so glad this has been helpful for you! It does get so technical, so fast.
Matt says
There is literally no me measurements for anything all I see is the instructions on how to do it. This is the most confusing recipe I’ve ever found with how you don’t have it laid out at the top of how much you need of each ingredient.
Indi Hampton says
Hmm, did you go to the recipe card? Here's the print recipe version: https://www.withspice.com/blog/artisan-pizza-dough-crispy-chewy-bubbly-crust/print/3594/
Nadia says
Question: the crust edges came out pretty tough without any anticipated bubbles 🙁 I followed the recipe and process according to the instructions, I did however use King Arthur bread flour instead of all purpose flour, but the dough has risen, doubled, I didn’t over manipulate it. The flavor was great, just the texture was not at all what I expected. I’m certain there’s something I didn’t do right, just don’t know what. Could it really have been the flour?
Courtney says
This recipe is incredible! It’s so tasty and surprisingly easy. Has anyone tried making it with fresh milled flour, and if so were any adjustments needed? Thanks.
June says
If I could give this recipe 5 million stars, I would, the best pizza dough and pizza I have ever tasted. And I have worked in a few awesome pizza shops, and made dough there. The bubbliness, the chewiness, the crispiness. Is mind blowing. I will never ever use another pizza dough for the rest of my life! Thank you from the bottom of my pizza, loving heart! I followed the recipe exactly and would never change it. You are my pizza goddess!
Missy says
I've been using this recipe for years! Fantastic only recipe I'll use better than any pizza place around me! I like super thin husband likes pan - I can do both with this dough! I've also made pepperoni rolls with it. I will say there's a learning curve bc it is very sticky. The more I make it the easier it is
Bethany says
I haven’t eaten this crust yet…Just wondering- I made it with instant yeast instead of regular because I couldn’t find me regular. Will this work? I skipped the first 20 min resting period…
Pizzaiolo Ingo says
You can use instant and just reduce the amount a little. The conversion is if a recipe calls for Active dry, multiply by .75 to get instant.. So unless you have a super sensitive scale that measures in fractions of a gram, then just make the measuring spoon a little under level. I've used both types at 1 gram with no noticeable change.
Use the 20 minute rest period (autolyzing) after making sure the flour and water are mixed in well. It does make difference in the overall consistency.
Kameryn says
This recipe is incredible! I’ve spent years looking for a good pizza crust recipe, and some came close to what I wanted, but this one is exactly it!! Soft but chewy with a crispy crust and lotssss of bubbles! Always a lovely result. Always impressed. And bonus points that it’s so easy to make and easy to work with. Thanks so much for a great recipe. I look forward to making it many more times.
Brian Cecillia says
This really helped me understand things better.... Your explanation cleared up my confusion..
Darsi says
This pizza crust is the best! I whip it up almost every week for my family. It’s my go-to meal when we have guests over because it’s so easy and tasty. They usually ask for the recipe. I’ve been weighing the flour instead of measuring, and since then, the crust is perfect every time.
Anna says
Dear Indi,
Thanks for sharing this lovely recipe! I’m not a great fan of pizza but this dough has totally changed my views!
It is always a hit with kids, family and friends!
However the dough seems to be way wetter than in your video. It’s really slacky and gluey. I can’t shape little balls proof overnight as it feels like pudding and spreads instantly.
I’ve used all purpose flour and pizza flour and ran into the same issue.
Have you got any tips?
It bakes up beautifully though!
Crystal B says
Truly amazing recipe! I tried it for the first time a few months ago and my husband is OBSESSED. We have pizza every Friday evening and lunch on Saturday now. One thing I think you should point out in the recipe is to use an airtight cover (saran wrap, etc.) when resting / rising. Not a lot of baking in this house because we don't eat a lot of bread, so I'm used to using a towel to cover...haven't baked bread-type goods in a LONG time! I tried this out with a silicone bowl cover that's airtight and WOW, the bubbles at the end of the resting process are unreal! I wish I could add a picture to show how beautiful it is. Also added a tbsp. of my homemade Italian seasoning (dry herbs) to the flour this time around for a little extra flavor. Even without the extra bubbly rise, the dough never disappoints. Bake it until I smell the slightest bit of "burnt" crust and it's always perfect with that little bit of char on the bottom. We brushed the edges of the crust with a butter, garlic, herb mixture, a few times and it was very tasty but a bit messy, so we opted for a "dipping" sauce with the same mixture for our "pizza bones." I think my husband loves me even more for our Friday pizzas alone! LOL With our mildly "gluten" sensitive tummies, neither of us have any issues. Not sure if it's my imported Italian flour or the recipe itself with all the bubbly (fermenting) goodness going on, but it's much appreciated for many reasons. Thank you!!!
Dee says
I read this entire post and all the comments about 15 times. Lol! Being a baker, I'm not generally intimidated by recipes but I was determined and had to get the his one right. Everyone was correct, this is the BEST pizza crust ever! I did find tripling the recipe to be a bit difficult however I also made a double batch and they both turned out great! Everyone enjoyed it. We're not buying frozen pizza ever again and I will only make this fresh pizza dough. Indi, Thank You so much for the delicious recipe with detailed steps provided.
Debra says
This recipe is exactly what I’ve been looking for ! Although it requires thought and devotion to well calculated time steps it’s worth the time . Choose at home this day to do laundry, mop the kitchen whatever occupies your time so you let you mixture proof. I went against my almost 50 years of making various yeast risen goodies and breads and was a believer of flour not damp hands! It works beautifully! The dough is different to handle than I’m used to, I expect to get better every batch I make! At some point I plan to shape some as mini sub rolls. I did take a pizza picture… need a hotter oven temp next time. I dared 450 on mine.
Colleen M says
Oh my!! I finally found our pizza dough after many years. I used bread flour and it was delicious.
Chewy and bubbly crust, perfect. I think next time I will divide it in three and make it a little thinner, my bad! cooked at 550 on a stone. 5 stars!
Melissa Christiansen says
Hello there, quick question. All I have on hand is instant yeast, would that work?
Indi Hampton says
Yes!
Elaine says
Step 1: Ooni
Step 2: This Recipe
The End.
Karen L says
Incredible pizza dough! I wanted a recipe that achieved the bubbly crust and this was everything I was hoping for! Thank you for this recipe.
Kacey says
This recipe is perfect! Even my picky eaters who will only eat dominos pizza ate it & loved it!! (I added 1/4 tsp of garlic powder in with the salt for a little taste)