caramelized white chocolate cherry bread
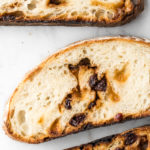
This chocolate cherry artisan yeast bread is crunchy, chewy, and addictive. It’s filled with tart cherries and toasty chunks of caramelized white chocolate!
- Prep Time: 1 hour
- Cook Time: 1 hour
- Total Time: 2 hours
- Yield: 1 loaf
- Category: Bread
- Method: Baking
- Cuisine: American
Ingredients
biga
- 3 cups + 2 tbsp (400 g) all-purpose flour
- 1 cup + 2 tbsp + 2 tsp (272 g) warm water
- 1/8 tsp (0.5 g) instant dried yeast
final dough
- 3/4 cup + 1 1/2 tsp (100 g) all- purpose flour
- 2 tsp (11 g) kosher salt
- ¼ tsp (1 g) instant dried yeast
- 1/4 cup + 3 tbsp (103 g) warm water
- all of the biga (recipe above)
- 1 cup (170 g) chopped caramelized white chocolate (you can buy it here, too)
- 1/2 cup dried sour cherries
Instructions
biga
- The evening before you want to bake the bread, whisk together flour and yeast in a large bowl. Pour in the water and mix with a large spoon until a shaggy dough forms. Use your hands to knead the dough further until it comes together, 1- 2 minutes.
- Cover with plastic wrap and leave at room temperature for 12- 14 hours. The biga is ready when it’s tripled in volume, speckled with gas bubbles and has a strong yeasty, fermentation smell.
final dough
- In a large bowl, whisk together flour, salt and yeast. Pour in the water and stir together with a large spoon until just incorporated.
- Add the biga and combine with the dough by using your thumb and forefinger as pincers to squeeze and pinch off big chunks of dough. Pinch through the dough five to six times, rotating the bowl as needed, then fold the dough over itself a few times. If your hands stick to the dough, it’s okay to wet them up to four times over the course of mixing. Repeat the pinching and folding until the dough is fully mixed and begins to stiffen up. Cover the bowl and let rise about 20 minutes, or until it’s relaxed and flattened out, at which point it is ready for the first fold.
- Sprinkle the white chocolate chunks and sour cherries over the surface of the dough. To fold the dough and incorporate the chocolate and cherries, moisten your hand and reach underneath the dough. Pull about a quarter of the dough up, just until you feel resistance, then fold it over the top of the dough. Rotate the bowl and repeat this folding four to five times, or until the chocolate and cherries are covered and the dough has tightened into a ball. Take the entire ball of dough and invert it in the bowl, so the seams are now face down and the top is smooth. Cover the bowl and let rise another 20 minutes, or until the dough has relaxed and flattened out.
- Repeat the folding two more times, allowing the dough to rest at least 20 minutes in between. After the third fold, let the dough rise until triple its original volume, about 2 ½ to 3 hours after initial mixing. Now it’s ready to be shaped and proofed.
- Put a rack in the middle of the oven, place your 4-quart Dutch oven on the rack with its lid on, then preheat the oven to 475°F (the Dutch oven needs at least 45 minutes to fully heat up).
- Dust a proofing basket with flour and set aside. Flour a work surface and your hands, then gently loosen the dough around the edges of the bowl, being careful not to tear the gluten strands. Sprinkle flour along the edges and bottom of the dough, as needed, to keep it from re-sticking to the bowl. Gently ease it out onto your work surface, with the unfloured top still facing up.
- To shape the dough, keep your hands on the bottom, floured surface of the dough to keep them from sticking. Then, stretch a quarter of the dough up just until you feel resistance and fold it across the top. Repeat this folding over until the dough is in a ball shape and the inside is fully enclosed. Flip the dough over so the seam is on the work surface and move it to a spot with no flour.
- As you face the dough, place your hands around the back side of the ball and gently drag it 6 to 8 inches towards you. The dough will grip the un-floured surface and the movement will tighten the ball. Give the loaf a quarter turn and repeat the tightening two to three times, or until the ball has enough tension to hold its shape. Place the shaped loaf in the proofing basket, seam side down and lightly flour the top. Cover the dough and proof for about 1 hour, or until it passes the finger dent test (when an indentation in the dough slowly and incompletely springs back).
- Invert the proofed loaf onto a lightly floured surface, so it is now seam side up. Very carefully, remove the hot Dutch oven from the oven, remove the lid, and place the loaf in the Dutch oven seam side up (you don’t need to score the bread, these seams will naturally open up as the loaf bakes).
- Put the lid on the Dutch oven and return to the oven to bake for 30 minutes. Remove the lid and bake uncovered for another 15 to 25 minutes, or until the bread is a rich brown color all over. Carefully tip the bread out of the Dutch oven and onto a work surface. Let it cool on a rack for at least 20 minutes.
Nutrition
- Serving Size: 1/8th of loaf
- Calories: 71
- Sugar: 7g
- Sodium: 592mg
- Fat: 3.5g
- Saturated Fat: 2.1g
- Unsaturated Fat: 1.1g
- Trans Fat: 0g
- Carbohydrates: 9.2g
- Fiber: 0.3g
- Protein: 1g
- Cholesterol: 2.2mg